Ross Lillistone Wooden Boats


Friday, July 13, 2012
Mayfly 14 launching.
| copied from Jim Michalak's catalogue |
| Here I am holding while owner Tony snaps a photo. |
| showing-off her well-designed hull shape and pivoting leeboard |
| Joel McDonald, from Allwood Sails, makes very good sails for traditional rigs |
| A shot showing the pivoting leeboard in action. It works equally well on either tack. |
| Very simple sheeting arrangement. Note the straps and Fastex buckles used to hold the excellent deck-hatches securely closed. There is a large hatch in both the foredeck and the aft deck. |
| Everything in the rig is super-simple, and almost every component can be made from line and wooden parts |
| The boats travels well on her custom trailer, made with crosswise supports appropriate to the flat-bottomed hullform |
| Another shot showing the trailer with three crossways bunks covered with UHMW plastic. |
| A simple, cheap, and highly practical boat. Wholesome fun! |
6 comments:
amazing boat collection... very beautiful... thnx for sharing....
Nice job on one of my favorite boats! Chuck Pierce
Ross Really nice job, the workmanship shows through. Tell me, did you stick stricktly to Jim Michalak's plans, or did you 'tweak' them anywhere ? Just curious as I have ordered the plans for Mayfly 16. Simon.

Thanks for all three comments. Simon, I stayed true to Jim's plans with one exception - I was concerned about the weight and bulk of the chine logs as designed, so I reduced their cross-section a fair bit, but only after having done a scantlings calculation using Dave Gerr's scantling rules to make sure that I was still above the minimum recommended size.
Mr Lillistone, Beautiful build of Mayfly 14. I have just purchased the plans and am currently procuring the materials. Despite all the attributes of external chine logs I have always thought that they distracted from the aesthetics of the boat. Would it be too much of an imposition of me to ask how much you reduced the chine logs cross section and the resultant dimension? I will starting my build very soon and will be frequently referring to your Mayfly pics and comments. Thank you. Most respectfully, Colin
Excellent example of simple, effective lugsail rigging.

| Plywood | 1/4" thick, | 3 sheets |
| Plywood | 1/2" thick, | 2 sheets |

Han Learns to Build a Boat – Jim Michalak's Mayfly 14
…. and with no prior knowledge/experience in woodworking, boat building and sailing
- About the blog
- Temporary Forms
- Side Panels
- Hull Assembly
- Mast Step and Mast Partner
- Leeboard Section

Building pictures into a 3.5 minute video
For those impatient folks like myself…. https://drive.google.com/open?id=0B6pmvIo8HIQ4UGJkNGRtdDVqZEE My two daughters picked the song – for the record, I was going for a “Boston”

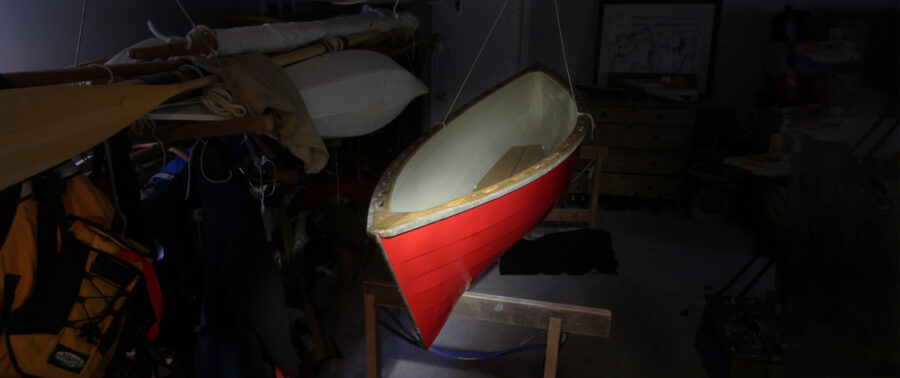
Hull is almost completed… but, unfortunately, this is where my boat building stops.
Hull is almost done. However, unfortunately, I won’t be able to finish my Mayfly 14… at least for another 3 years. About 2 months ago, I found out that I need … Continue reading →

External stem
I decided quite a while ago to add an external stem. Not for any specific reason; it just looks cool and seems like most of the Mayfly 14 builder seems … Continue reading →

Decks painted and attached
Nothing special here. Two coats of marine primer, two coats of marine paint to the top side and one coat to the bottom side. Same primer and paint from Rustoleum used to paint … Continue reading →

Upper and lower leeboard guard attached
Last week, I attached the lower and upper leeboard guard to the hull. The lower leeboard guard was attached using six #8 stainless steel screws and washers. Note that the two at … Continue reading →

Hull painted
I had to move the boat out from the basement as ventilation is not good and the smell from paint goes right up to kids bedrooms. I used Rustoleum Marine … Continue reading →

Leeboard and Upper Leeboard Guard
Shaping the leeboard took some effort and patience. I started off with an orbit sander, then eventually I ended up buying a belt sander with a few 40 grit sanding … Continue reading →

Lower leeboard guard
The overall process took way more time than I thought due to my lack of jig saw skill. While I was cutting the lower leeboard guard into shape with a … Continue reading →

Mast Step – back to boatbuilding after a two month break
I made little progress over the last two months – not zero but one or two hours a week at most. Usually the second quarter is the busiest time of … Continue reading →

Decks and coamings completed.
Over the last few days, I finish the decks and coamings. Decks were first cut to rough size and then a router was used to get to the final size. The … Continue reading →

Hull – Joints glass taped.
Over the last three days, mostly after the kids went bed, I worked on glass taping the joints. The whole process took about eight hours, 3X vs. what I expected. … Continue reading →

Hull flipped right side up, excess epoxy cleaned up and hull alignment checked
Today, I flipped the boat right side up. It’s been about 2 moths since I saw the boat this direction. Again, two young daughters won’t help much here so I … Continue reading →

Bottom – fairing and two epoxy fill coats; didn’t go very well.
Last week, I faired bottom, especially where the 3 in glass tapes were added and applied two layers of epoxy fill coats. Two epoxy fill coats were added over 4 … Continue reading →

Bottom glassed!
Today was a big milestone. Bottom was finally glassed and it went probably not perfect but without any major issues that can’t be fixed. I originally thought 2 hours should … Continue reading →

Bottom – fairing done and ready to glass
Progress has been slow as I struggled from jet lag this whole week after two weeks of Asia trip. Last couple of days, I spent a few hours fairing the areas … Continue reading →

Bottom attached!
I am starting my two week business trip to Asia today so I spent a good four hours yesterday till 11pm attaching the bottom. It was a slightly stressful process, … Continue reading →

Bottom – 3 bottom sections rough cut and block butt jointed
I wasn’t sure what type of wood to use for the butt joint as it probably need to handle a fair amount of stress. Eventually, I decided to glue layers … Continue reading →

Chine logs installed
Over the last weekend, chine logs were ripped, beveled at ∠10°, edge rounded and installed. This was the first time for me to see the hull upside down. One set … Continue reading →

Homemade bench cookies
I made my own version of bench cookies out of 2×4 blocks with left over epoxy after scarf jointing chine logs. Looks like I’ll get some good mileage out of … Continue reading →

Wales completed
I came back from CES in Las Vegas last Friday and completed the wales over the weekend. First thing I did was to reasonably trim the excess side panels using … Continue reading →

Wales – port side inner wale attached
I added ∠10º bevel to the inner wales using my table saw and dry fitted them with clamps. And the joint survived. To attach the wale, I used epoxy with silica … Continue reading →

Wales – Scarf jointed two 3/4″x1-1/2″x8 ft to get a full 16 ft piece; was not as easy as I hoped
I tried to find anything 16 ft long from my local Home Depot, mainly to avoid jointing work. The only thing I could find was a finger joint (FJ) primed board. … Continue reading →

Made an air purifier for my basement shop
I am building Mayfly 14 at my basement and I would say ventilation is not very good; in addition it’s upstate NY here and I seldom open windows and door … Continue reading →

Hull – stem, transom, bulkheads and side panels epoxy glued and screwed
Last few weeks has been pretty hectic with my work and I was not able to make much progress. Also I was spending whatever time I had building an air cleaner … Continue reading →

Hull – dry fitted side panels, stem, bulkheads and transom
Using drywall screws, I assemble the hull – stem, bulkheads, transom and temp forms to the side panels. After many iteration of unscrewing and screwing, I felt like I got it close enough. … Continue reading →

Transom – screwed up again and had to build a new one….
I actually was able to sort of fixed the mistake I made last time, as in the picture below and now I have room to make an outty bevel. However, now I … Continue reading →

Stem completed
I cut the stem a few inches longer that what it needed to be and dry fitted first to see if it interacts well with the side panels. Before I make cut … Continue reading →

Stem – bevel cut with my new table saw
I got my first table saw a couple of days ago and finished the stem today after dinner. My first cut was a bevel rip cut (if I got it … Continue reading →

Side panels completed – error in the plan?
Last weekend, I finally completed the side panels. I don’t have a wooden batten so I had to come up with “something”, and I found a ~11 ft left over siding which … Continue reading →
Side panels – Epoxy started to cure!
After two days, total ~10 hours of heating with hot air, tackiness is almost gone and epoxy feels quite solid. I am guessing more time is needed for the epoxy to fully … Continue reading →

Fiberglass-butt-jointing the side panels but having epoxy curing issue
As I shared in one of my earlier postings, I am using fiberglass butt joint to connect the two sets of 2X8 and 2X6 panels – 2 layers of 3″ tape … Continue reading →

Transom – I think I made a major mistake here
As I was trying to figure out how to make the bevel cut to the top and bottom frames of the transom after the two side frames were glued and … Continue reading →

Bulkheads completed but will need some filling work later
I finished the two bulkheads over the last couple of days. Titebond III and stateliness screws I bought from DUCKWORKS were used. Bulkhead 4.2 has a double framing on the top … Continue reading →

Temporary forms completed – the first sawdust!
A few days ago I completed the two temporary forms. Basically my first sawdust. As a first timer woodworker, it took longer than I thought, 3 hours believe it or … Continue reading →

Side Panels – “fiber glass butt + short scarf joint” instead of “butt block joint” (planning)
In Jim Michalak’s book “Boatbuilding for Beginners (and Beyond)“, he uses butt block joins to connect plywood. However, I am planning to use fiber glass butt joint instead for the following reasons: … Continue reading →

Plywood arrived but…
Plywood arrived yesterday. However, when unpacked (and I have to say that it was very well packaged), I found out that all three 1/4 sheets had some bend/warp; Some as big … Continue reading →

Workbench completed
I spent a a few hours yesterday and today to build the 4X16 work bench. It’s basically two 4x8s side by side. Likely early November is when when I’ll actually start … Continue reading →

Why did I decide to build Mayfly 14
What I really wanted to build is Paradox, or Enigma 460 (if there is a detailed plan) by Matt Layden. As I was going through 150 pages+ of Paradox build plan and manual I purchased, … Continue reading →

How this boat thing got started…
I always had this fantasy of traveling alone long distance for a long period of time where there isn’t much civilization and by means of something that does not burn … Continue reading →
Blog at WordPress.com.
- Already have a WordPress.com account? Log in now.
- Subscribe Subscribed
- Report this content
- View site in Reader
- Manage subscriptions
- Collapse this bar
Great choice! Your favorites are temporarily saved for this session. Sign in to save them permanently, access them on any device, and receive relevant alerts.
- Sailboat Guide
Mayfly is a 12 ′ 9 ″ / 3.9 m monohull sailboat designed by John V. Kelley and built by South Devon Boatbuilders (UK) starting in 1957.
Rig and Sails
Auxilary power, accomodations, calculations.
The theoretical maximum speed that a displacement hull can move efficiently through the water is determined by it's waterline length and displacement. It may be unable to reach this speed if the boat is underpowered or heavily loaded, though it may exceed this speed given enough power. Read more.
Classic hull speed formula:
Hull Speed = 1.34 x √LWL
Max Speed/Length ratio = 8.26 ÷ Displacement/Length ratio .311 Hull Speed = Max Speed/Length ratio x √LWL
Sail Area / Displacement Ratio
A measure of the power of the sails relative to the weight of the boat. The higher the number, the higher the performance, but the harder the boat will be to handle. This ratio is a "non-dimensional" value that facilitates comparisons between boats of different types and sizes. Read more.
SA/D = SA ÷ (D ÷ 64) 2/3
- SA : Sail area in square feet, derived by adding the mainsail area to 100% of the foretriangle area (the lateral area above the deck between the mast and the forestay).
- D : Displacement in pounds.
Ballast / Displacement Ratio
A measure of the stability of a boat's hull that suggests how well a monohull will stand up to its sails. The ballast displacement ratio indicates how much of the weight of a boat is placed for maximum stability against capsizing and is an indicator of stiffness and resistance to capsize.
Ballast / Displacement * 100
Displacement / Length Ratio
A measure of the weight of the boat relative to it's length at the waterline. The higher a boat’s D/L ratio, the more easily it will carry a load and the more comfortable its motion will be. The lower a boat's ratio is, the less power it takes to drive the boat to its nominal hull speed or beyond. Read more.
D/L = (D ÷ 2240) ÷ (0.01 x LWL)³
- D: Displacement of the boat in pounds.
- LWL: Waterline length in feet
Comfort Ratio
This ratio assess how quickly and abruptly a boat’s hull reacts to waves in a significant seaway, these being the elements of a boat’s motion most likely to cause seasickness. Read more.
Comfort ratio = D ÷ (.65 x (.7 LWL + .3 LOA) x Beam 1.33 )
- D: Displacement of the boat in pounds
- LOA: Length overall in feet
- Beam: Width of boat at the widest point in feet
Capsize Screening Formula
This formula attempts to indicate whether a given boat might be too wide and light to readily right itself after being overturned in extreme conditions. Read more.
CSV = Beam ÷ ³√(D / 64)
An early, light weight,low cost yet high performance dinghy. The single chine, slab sided hull simplified construction for the amateur builder. An unfinished, bare hull version was also available. Though several hundred were built and raced as a class for a few years, it seems to have been eclipsed in favor of the similar but slightly larger SEAFLY, from the same builder which sold in larger numbers and was later offered in fiberglass. An excellent web site, seaflymemories.com relates in greater detail, what is known of both boats, which today are rarely seen.
Embed this page on your own website by copying and pasting this code.
Discover Related Sailboats

- About Sailboat Guide
©2024 Sea Time Tech, LLC
This site is protected by reCAPTCHA and the Google Privacy Policy and Terms of Service apply.
Product Reviews
An RSS Lugsail
Mayfly 14 Pierce Expedition from Really Simple Sails
From Issue December 2023
I n 2011 I built a Mayfly 14 as designed by Jim Michalak. He recommended “that my customers sew their own sails either from common polytarp…or real Dacron sailcloth. I can do it and so can you.” So, I made a polytarp 76-sq-ft balance lugsail from the Mayfly plans. I sailed with it in the 2011 Texas 200 where it quickly started coming apart due to my terrible workmanship. After the 2011 event, a friend sent me a Mayfly 14 sail that he had made of Dacron sailcloth, which was a vast improvement, but five 200s and many other cruises in high winds took their toll on that homemade sail. I turned to Michael Storer, a well-known small-boat designer with expertise in balance lug rigs, for advice. As luck would have it, he had recently opened a sail loft called Really Simple Sails, which specializes in sails for small boats, especially lugsails. I decided to order the sail from RSS.
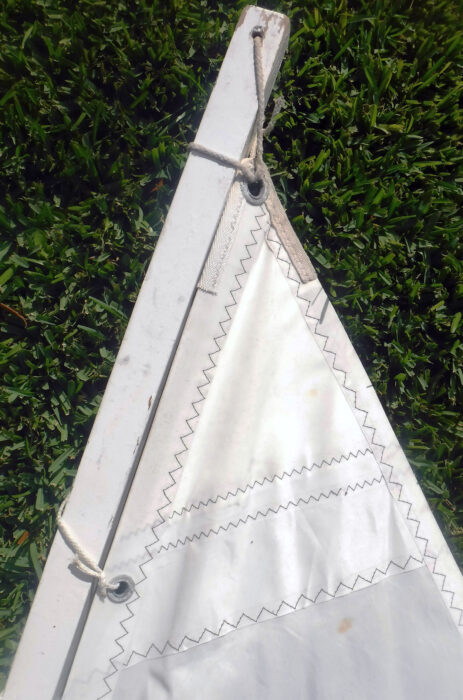
The RSS lugsail combines time-honored reinforcing including leathered corners and stitched corner patches, with modern 4-oz sail cloth. The corner grommets are pressed stainless steel with plastic inserts.
I had some specific requirements for my sail. Given the high winds that are routine on the Texas coast, I wanted sailcloth that was heavier than normal for a sail of this size. I requested three reefs, with the third reef essentially making the sail a lateen. The cringles for the third reef needed to be angled up as they went aft so that the boom would not droop when the sail was fully reefed. The sail was to be loose-footed for draft control and, lastly, I asked for a heavily reinforced tack to accommodate the loads from the downhaul. Michael had me measure the amount of bend in the yard and boom under moderate downhaul pressure, and I sent him drawings of how those were built so that he could factor the curve of the spars into the sail design.
T he sail arrived in May 2018. The build quality was excellent. RSS had used 4-oz cloth, and the three laser-cut panels that made up the sail had a single row of triple-stitch zigzag stitching that was straight and consistent, with uniform panel overlap. The tack, clew, throat, and peak were all reinforced with patches on one side, as were the reefpoints and reef cringles on the luff and leech. Grommets for the corners and primary reef grommets were pressed stainless steel with plastic inserts. The reefpoints were conventional nickel-plated brass spur grommets. Around the sail perimeter there was 2″ Dacron tape folded in half and stitched.
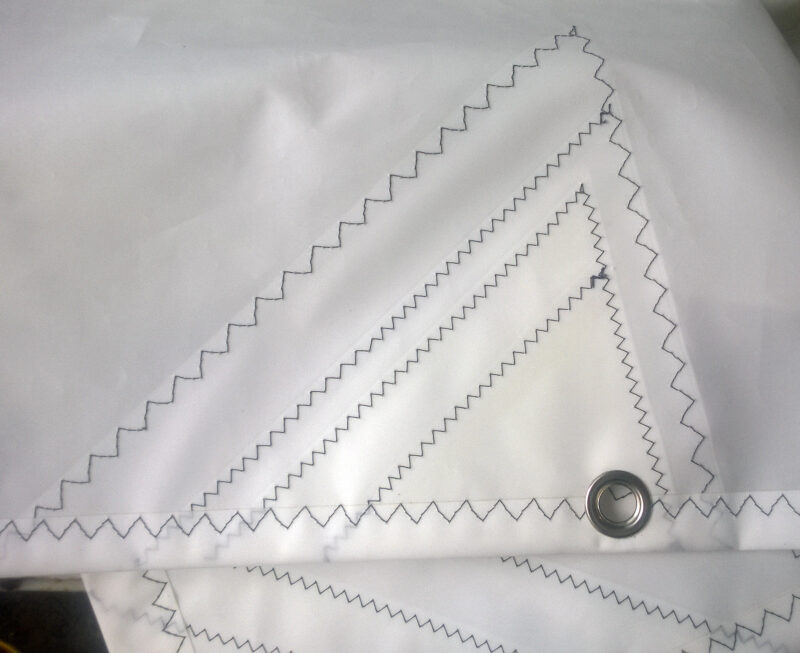
The reef cringles are heavily reinforced as befits parts of the sail that will become the heavy-lifters in strong winds.
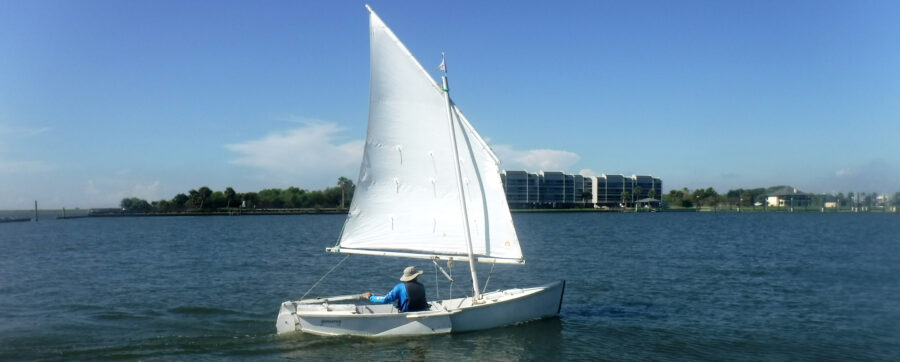
I used the sail for the first time when I entered the 2018 Texas 200. On the first day of the event, I played with the set of the sail and discovered that it liked to be a little farther forward than the old sail, so I moved the halyard attachment point on the yard aft about 4″. The sail performed quite a bit better than the homemade sail, powering my Mayfly 14, GAMARAY, up to a degree that I had not experienced in seven years of sailing her. Downwind she was a bit faster, and by afternoon the winds were high enough that she would occasionally plane in gusts, which had never happened with the old sail. By the afternoon of the first day, winds hit 30 mph (according to the NOAA weather station I was monitoring) so I pulled ashore at the turn into the Mansfield Cut and put the third reef in. I then tacked up the channel for about 6 miles to the camp. Out of the 13 boats that made it to the camp, there were only three others that sailed up as opposed to motoring. The lugsail did a great job on all points of sail, even to windward, whether under full sail or reefed.
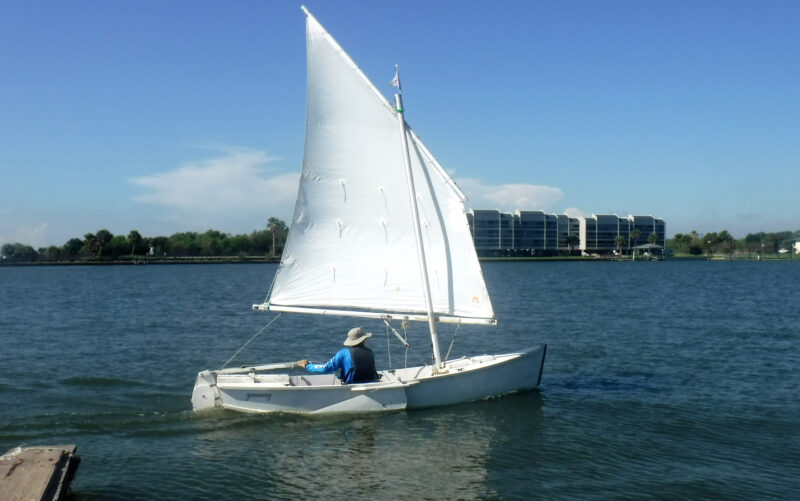
The author shows off his well-set RSS balance-lugsail. When he used it for the first time in the 2018 Texas 200, the winds rose to about 30 mph. He pulled ashore, put in the third reef and sailed upwind for 6 miles.
Over the past five years, I have used the RSS sail on my Mayfly 14 for four Texas 200s and on a Michael Storer 16′ Quick Canoe trimaran for this year’s 200. I’ve also used it on my 8′ David Routh Puddle Duck Racer. Once it was positioned correctly in relation to each boat’s center of lateral resistance, the sail performed well on all three.
My custom-built lugsail has been a rugged workhorse and RSS decided to make it a standard offering—the Mayfly 14 Pierce Expedition—and has sold it for use on a variety of small boats. It works very well when set up properly; balance lugs are easy to deal with, even for a singlehander.
Chuck Pierce is retired and lives in Beaumont, Texas, with his wife Kathy and Stella the Crazy Dog. He plays music, repairs and restores old analog synthesizers, brews beer, and builds stuff, including several small plywood boats. He goes on as many sailing and paddling trips as he can.
Really Simple Sails offers stock sails direct and through Duckworks . RSS also makes custom sails upon request . The Mayfly 14 Pierce Expedition sail, custom-built for the author, is now a stock sail. It sells for $456 in white, $475 in tanbark.
Is there a product that might be useful for boatbuilding, cruising, or shore-side camping that you’d like us to review? Please email your suggestions.
Share this article
Join The Conversation
We welcome your comments about this article. If you’d like to include a photo or a video with your comment, please email the file or link.
One thought on “ An RSS Lugsail ”
Of course I am biased – but nice article Chuck. I think it understates the depth of your various adventures in the Texas 200 and other sailing – but I can’t complain!
Leave a Reply Cancel reply
Your email address will not be published. Required fields are marked *
Stay On Course
More From This Issue
From The Editor
John, as I’ll call him here, built the canoe from scratch. The Piccolo was designed by Bob Baker for traditional construction: 1⁄4″ cedar planks on steam-bent frames with breasthooks cut…

Boat Profile
Lawton Tender by Newfound Woodworks
Lawton built his tenders with carvel planking over delicate bent-oak frames. Newfound Woodworks worked from Gardner’s offsets, lines, and descriptions of Lawton’s building techniques to produce plans for a Lawton…

AdvancedFrame Sport Kayak
I kept coming back to the sweetly designed 10′ 6″ AdvancedFrame Sport Special Edition from Advanced Elements. With its semi-enclosed cockpit, moderate 32″ beam, and enthusiastic reviews, it seemed a…
The Heart of a Cruiser
Several years before that cruise, I had experienced some intermittent heart-rhythm fluctuations that came and went. As an otherwise fit amateur athlete who had never smoked, never been overweight, had…

A Canvas Lounger
Almost anywhere land meets water there’s a view to be taken in and the best way to do that is to sit down, get your feet up, and lean back…
I turned to Michael Storer, a well-known small-boat designer with expertise in balance lug rigs, for advice. As luck would have it, he had recently opened a sail loft called…

Nor’wester
From an early age sou’westers have been the only kind of wet-weather hats I’ve worn while boating. For the past few decades, I’ve worn a Black Diamond Sou’wester. It’s made…

Reader Built Boats
The Tuesday Group Builds a Boat
The Colorado building team began work in 2017. By early 2019 the boat was finished. All it needed now was the engine to be installed. Around the time the project…
More Product Reviews
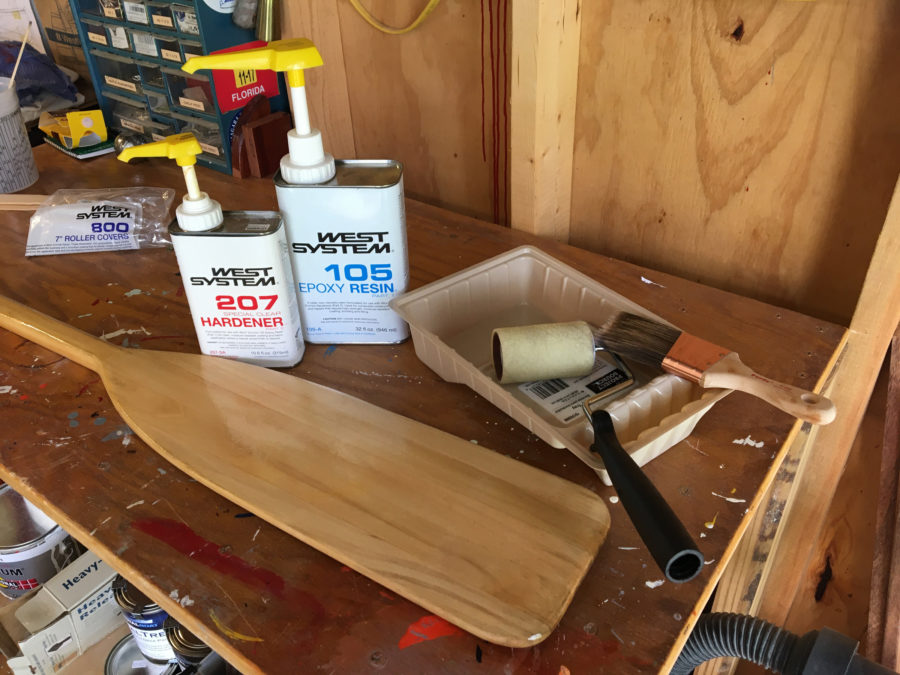
WEST Special Clear Hardener
The key feature of 207 is that it does not turn amber like the 205 Fast, 206 Slow, and 209 Ultra Slow hardeners. It includes a UV inhibitor, so if…
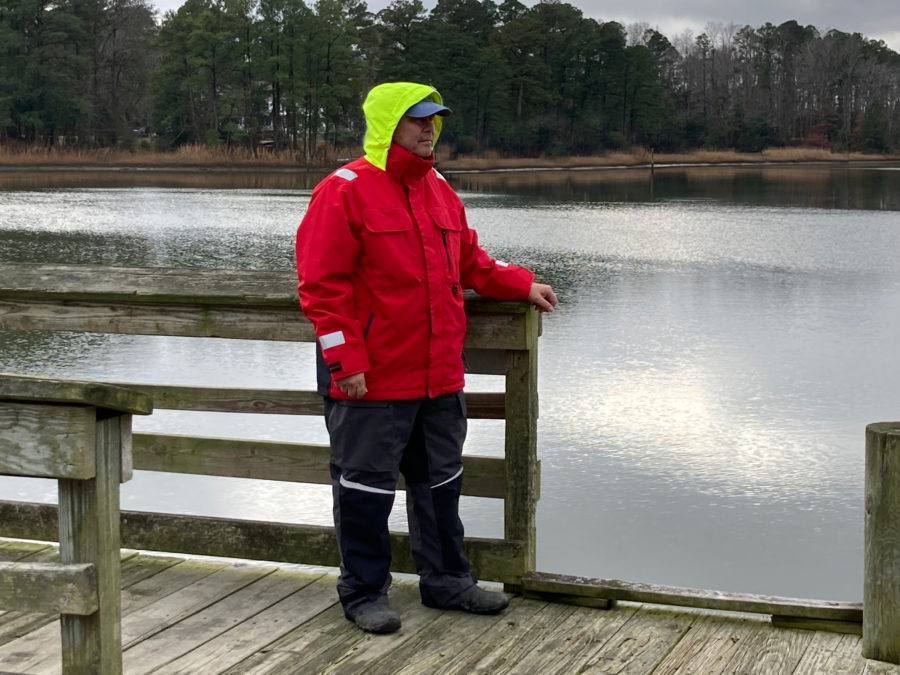
Third Reef Foulies
The Third Reef line of foulweather gear has many well-thought-out features and does not feel restrictive or heavy, which makes it comfortable to wear for extended periods and affords plenty…
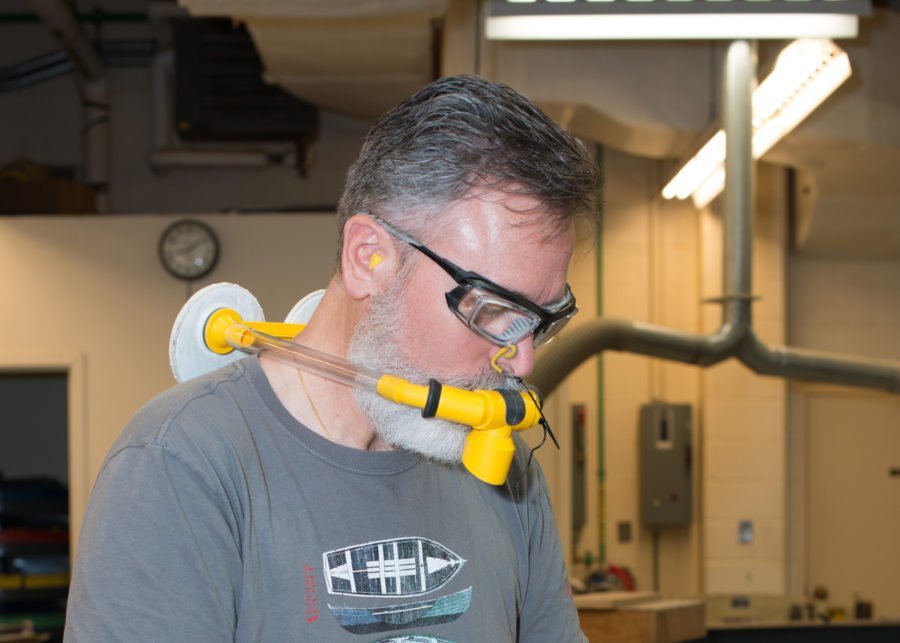
Resp-O-Rator
The Resp-O-Rator, an odd-looking device with twin snorkels connected to disposable dust filters, isn’t compromised by a beard. The mouthpiece goes between lips and teeth, and the attached clip clamps…
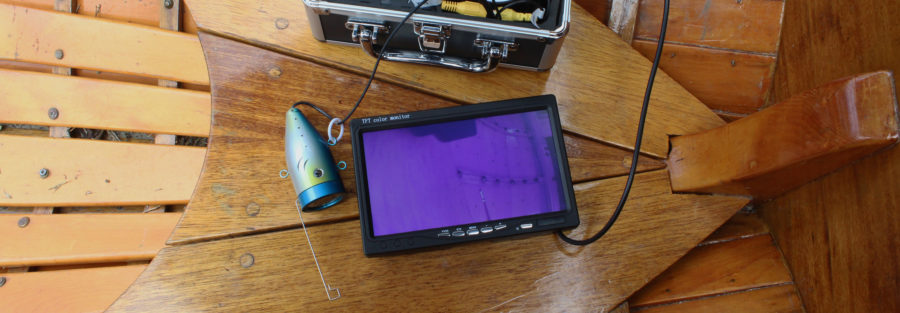
Eyoyo Underwater Video
Over the years I’ve been hoping to find a new underwater video system that was more compact and equally affordable, and recently decided to take a chance on the $140…
Subscribe Today!
Become a subscriber today and you’ll recieve a new issue every month plus unlimited access to our full archive of backlogged issues.
Already a subscriber? Sign In
Subscribe For Full Access
Flipbooks are available to paid subscribers only. Subscribe now or log in for access.
Home » Cheap Hack for 10 percent more upwind Sailboat Performance
Cheap Hack for 10 percent more upwind Sailboat Performance
When a boat owner considers upgrading their boat to make it safer and get more performance, often the first thought is for new sails which are expensive, but a cheap hack is to improve the foils (centreboard or leeboard) which might take little more than a couple of weekends and cost around 50 bucks.
How much sailing Performance Improvement from foils? #1 Cruising Sailor – Chuck Pierce TX
Chuck Pierce is a well known Texas Adventure Sailor. He was interested to improve the performance of his Mayfly 14 to make the boat more capable for cruising.
Chuck wrote: The leeboard was initially roughly shaped according to Jim’s instructions. I tried to get both sides the same, but didn’t spend a whole lot of time on it. I had a whole boat to build, and had never done any of this boat building stuff before. It worked ok. I sailed the Mayfly for about 3 years with the board like that.
In 2014 I got some fairing compound and made a template (sized up appropriately) from the OzGoose plans that you were nice enough to send me, and spent a couple of hours fairing it to the foil shape you use, so that I could use it on ECDuck in the Tx200 that year.
It did quite well on that trip. I was able to go places (upwind) that some of the others could not. This was useful. :) When I put it back on the Mayfly, it made that boat sail even better. She comes about smartly, and seems to have less leeway going upwind.
I have a plan for making notes on compass heading vs GPS track when I tack up the Port Mansfield channel on this year’s 200 so that I can figure out exactly how much leeway she is making.
How much sailing Performance Improvement from foils? #2 Cruising Sailor – Robin (Sydney)
Robin is a old friend, pilot, builder of sailboats and aircraft. He probably rolls his eyes when I talk about the difference that accurate foil shapes make to the handling and performance of a boat. At a tiny fraction of the cost of a new set of sails he improved the performance of his Ness Boat.
Robin wrote: Applying Mik’s Viola foil templates to the centreboard of an Oughtred Ness Boat. First impressions under sail: less heeling and easy speed to windward where it used to take a fair bit more concentration (non performance sailor point of view). On my sail last Sunday I just found myself having to pay much less attention to getting through and acceleration after each tack. Definitely worth a few weekends work.
So how was Robin’s boat before – Why make the effort?
From Robin: I had of course read your stories on storerboatplans.com, particularly the Orange Boat one, and I’d bought several of your plans with the template included.
The boat can work to windward but I think not as well as it could (from reading) and I usually had problems tacking, decelerating quickly, getting caught in irons and having to back wind the main to come about.
Even “Scaring Ourselves” because of trickier handling than some Ness Boats.
When the boat was starting the new tack it felt ‘mushy’,
I’d bear away to try picking up speed and lose some of what I’d gained on the previous tack.
Every now and then it could get into a groove which was startlingly different but I had no idea how to reliably and repeatedly get into it. Putting on my flying hat I thought of the narrow WW1 airfoils and the nasty stall characteristics, and that it was quite possible that my centreboard, during construction or in the intervening 15 years of groundings and trailer dents, was doing something similar.
4 Part Series – Homemade foils for better Performance and Safer Handling
- Adding around 10% to upwind performance with accurate foils.
- Don’t use Plywood for Centreboards, Rudders and Leeboards
- Shaping Foils using a template in not much time
- Glassing the Accurate Foils
- Protecting foils with simple centrecase and rudderbox paddling
How Robin reshaped his foils
First Robin chose a section. As above he decided to use our foil section in our plans which is derived from the optimisation work by Neil Pollock.
The simplest way to get hold of the template is to buy our Oz Goose Plans for $36. There is a lot more than just that section that will be useful. It is really a boatbuilding course in a book. We have a scaling method in the plans or you can blow up the section on a photocopier.
And the whole building process is covered step by step.
In general the leading edge is 30% of the foil width. The trailing edge around 50% of the foil. The extra approximate 20% width is a flat area that prevents the foil from rocking around as you shape it which increases accuracy enormously. The 20% extra can be cut off the back of the foil so it goes down to zero to provide an accurate taper if desired.
Both methods rely on the template and foil sitting on a flat surface which becomes a reference surface. The thickness of the foil also has to accurately match the max height of the template. When the base of the template hits the table and the highest part of the template matches the thickest part of the foil … you are done!
Template type 1
Robin has a bandsaw so printed, scaled and glued the paper copy to the timber he was going to use as a template. Use a non water based glue or the paper will change shape.
Robin planned to glue his sandpaper to the template with hot melt glue and release with a hot air gun. He found this a bit slow.
One point .. there should be no sandpaper on the area of the template that runs along the high point of the foil
Template type 2 – most common method
The more common type of template is just ply. And you work from top to bottom of the foil marking the high spots. Then remove them using a plane intially. Then mark the high spots using the template again. Getting closer change over to a sandpaper block. When the last high spot is just gone, the foil is shaped!
The other way to get the foil shape – plot the original Pollock foil curves
I strongly believe that section accuracy almost trumps section choice. In the NS14 class “Laminar flow” sections are popular despite the boats spending most of their time far below the Reynold’s numbers where the laminar section has any advantage.
Pollock Leading Edge.
y=Tmax*( 8*SQRT(x)/(3*SQRT(XLE)) – 2*x/XLE + x^2/(3*XLE^2) ) where: y is the thickness at a given value of x Tmax is the maximum thickness as a fraction of the chord x is the position along the chord from 0 to 1 XLE is the length of the tapered leading edge. (the LE is upper case because a small L could look like a 1 or I.
Pollock Trailing Edge.
y=Tmax*(1 – (3*x^2)/(2*Xte^2) + x^3/(2*Xte^3)) where: y is the thickness at a given value of x Tmax is the maximum thickness as a fraction of the chord x is the position along the chord x is 0 at the beginning of the taper and x increases to Xte at the trailing edge of the foil Xte is the length of the tapered trailing edge
How much sailing Performance #3 Racing Sailor (me in a past life)
We know the 10% figure from the NS14 class which recorded the times of boats involved in races. They found a 4 minute time improvement. As well and the handling and safety improvements. This might not sound like much, but it only increases upwind speed. Upwind time was around 35 to 50 mins.
In the 1970s I bought a second hand NS14 Dinghy (one before the one above). The centreboard and rudder were around the normal length but the boards were a bit wide. So I decided to modify them myself reshaping in line with more modern theory – moving the point of maximum width back slightly and producing a pair of really smooth shiny foils.
A year later I felt that I had got the hang of the boat and was now looking to do everything possible to make it faster. A new mast, new sails the fittings reorganised so the boat would work like clockwork. It improved a bit more.
Finally I decided to get rid of my homemade foils and buy the best ones available.
Racing Revelation
The first time I raced the boat was a revelation. Suddenly I was in amongst the top few boats in speed. But more importantly the boat felt completely different.
Exactly as Robin experienced with his quite different boat it would now tack and gybe faultlessly coming out of the manoeuvres with heaps of speed rather than having to get the boat moving again. (just like Robin) When there were big waves and lots of wind it would sail smoothly – before it used to stagger and stall. When sailing in tight conditions with lots of boats around (like milling around before the start) it gave me the confidence to go in close and pick out a good spot without getting into tangles with other boats.
Qualitatively and quantitatively the boat was much better – safer and more fun. The difference between my hand hewn foils and the manufactured ones is not really all that great – almost the same amount of labour – but the manufactured foils were built carefully to accurately reflect the correct airfoil (wing) section.
They used templates to get that accuracy. With this knowledge I have never needed to pay someone for first class foils. About 150 dollars worth of materials and a few hours of light labour (for small boats anyhow) and I can make a set the equal of what I could buy for around 1000 bucks.
Oz Goose Plans with foilmaking instructions and template with scaling method. (Can also scale using the printing scaling on your computer. https://www.duckworks.com/product-p/oz-goose-id.htm
Leave a Comment Cancel reply
This site uses Akismet to reduce spam. Learn how your comment data is processed .
|


COMMENTS
Mayfly 14. by Brian Graham - San Antonio, Texas - USA. My name is Brian Graham and I'm 29 years old. First and foremost, I'd like to thank the Lord for the ability and talents He has blessed me with to build this boat and sail it. Secondly, I'd like to thank my family for sticking by me when I was stressed out or working late.
Mayfly 14 Plans PDF. Mayfly14 is a straight forward flat bottomed plywood skiff for sailing and rowing. She's easy to build because her planks have no twists. That means that the chine log and wale bevels are constant for all practical purposes and can be presawn before assembly. The construction is of the simplest nail and glue variety with no ...
Gamaray. , a Mayfly 14, Does the Texas200 - Pt 1. by Chuck Pierce - Beaumont, Texas - USA. Michalak Mayfly: Part 1 - The Build. Part 2 - Prep and Camps 1 and 2. Part 3 - Camp 2 to Aransas Bay. Part 4 - Camp 4 to Seadrift. It all really started when Chuck Leinweber changed the route for the 2011 Texas200.
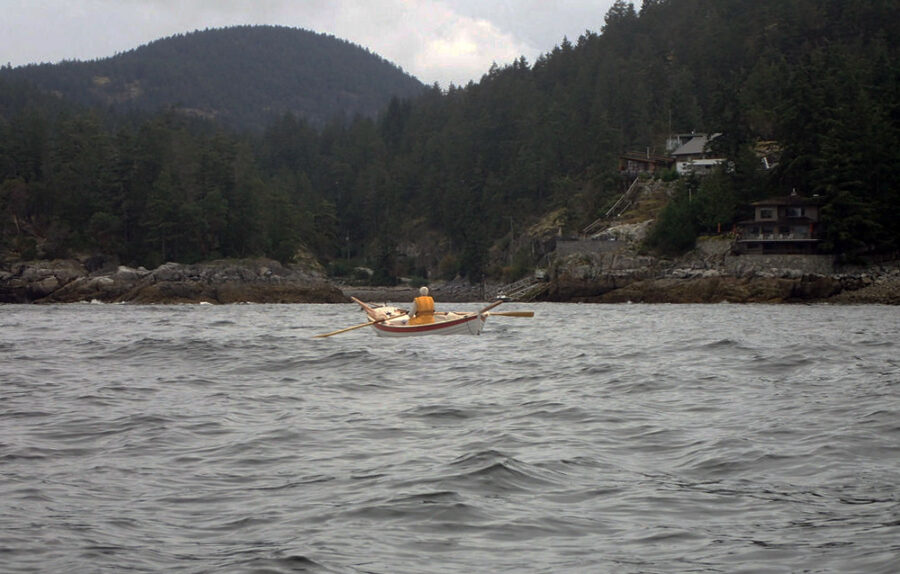
Jim Michalak has a wonderful understanding of flat-bottomed hull design, and Mayfly 14 demonstrates his mastery. On launching day, Mayfly 14 was loaded down with the weight of two large men and gear, but she sailed superbly right from the start. The boat was very light on the helm, demonstrated precise handling, and proved to be unusually close ...
This documentary shows the building and sailing of a Jim Michalak-designed 14 foot sailing skiff. Great project for anyone that likes the water and wants a ...
Gamaray. , a Mayfly 14, Does the Texas200 - PT 2. by Chuck Pierce - Beaumont, Texas - USA. Michalak Mayfly: Part 1 - The Build. Part 2 - Prep and Camps 1 and 2. Part 3 - Camp 2 to Aransas Bay. Part 4 - Camp 4 to Seadrift. The next morning I loaded the boat up and headed to Magnolia Beach to meet my friend Stan Roberts.
Kate Bannon and her friend Rachel Doss go for their first sail in Kate's newly acquired Mayfly 14 on Lake Somerville, Texas, on May 17, 2021. Winds were very...
Crossing Baffin Bay in my Michalak Mayfly 14, "Gamaray" on the third day of the 2011 Texas 200. Video courtesy of John Votaw.
Pictures of Mayfly14. Type: Multi Purpose Skiff Designer: Jim Michalak Foil: Leeboard Hull: Chine log Cabin: No Length: 14' Beam: 4' Weight Empty: 200 lbs. Ballast ...
Hull is almost completed… but, unfortunately, this is where my boat building stops. Hull is almost done. However, unfortunately, I won't be able to finish my Mayfly 14… at least for another 3 years. About 2 months ago, I found out that I need … Continue reading →
Mayfly is a 12′ 9″ / 3.9 m monohull sailboat designed by John V. Kelley and built by South Devon Boatbuilders (UK) starting in 1957. Great choice! Your favorites are temporarily saved for this session. ... Mayfly is a 12 ... 1963 • 14 ′ 9 ″ / 4.5 m ...
An early, light weight,low cost yet high performance dinghy. The single chine, slab sided hull simplified construction for the amateur builder. An unfinished, bare hull version was also available. Though several hundred were built and raced as a class for a few years, it seems to have been eclipsed in favor of the similar but slightly larger ...
After the 2011 event, a friend sent me a Mayfly 14 sail that he had made of Dacron sailcloth, which was a vast improvement, but five 200s and many other cruises in high winds took their toll on that homemade sail. I turned to Michael Storer, a well-known small-boat designer with expertise in balance lug rigs, for advice.
Gamaray, a Mayfly 14, Does the Texas200 - Pt 3 by Chuck Pierce - Beaumont, Texas - USA. Michalak Mayfly: Part 1 - The Build Part 2 - Prep and Camps 1 and 2 Part 3 - Camp 2 to Aransas Bay ... In a boat with a 12 foot waterline these speeds are plenty fast as far as I am concerned (course my main cruising boat is a Potter 19 so it's not like I ...
03-21-2014, 10:59 PM. Re: Jim Michalak's Mayfly 16. Originally posted by Nicholas Scheuer. Pretty nice! Those hatches look well-suited for an "expedition" vessel. Never liked exterior chine logs, though. Bolter used them a lot, and he also said "anything causing eddies forward of the maximum beam will slow the boat".
CABIN SAILBOAT, 18' X 6", 1300 POUNDS EMPTY A while back I presented a design called Fatcat2 which was a 15' x 6' unballasted sailing cuddy catboat. ... Decrease Quantity of Mayfly 14 Plans PDF Increase Quantity of Mayfly 14 Plans PDF. Price: $35.00. Subtotal: Add to Cart. Add to Cart. Ladybug Plans PDF. $45.00. Ladybug is a lot like Woobo ...
Chuck Pierce is a well known distance sailor and he optimised his Mayfly 14 cruising dinghy lug sail setup and optimised foils to maximise sailing performance to get into the difficult places he needs to get into. ... And this in a 14ft boat. 30knots, third Reef getting upwind - strong wind performance - only 4/45 boats make scheduled camp ...
A Mayfly 14 Story. by Tom Burton - Champaign, Illinois - USA. This story begins with a love of airplanes. My dad has been an aviation enthusiast for many years. Starting in the 60's he began accumulating "Sport Aviation" magazines. His goal had been in those days to build a Gyrocopter. A perhaps not unnatural fear of the rotor blade ...
Chuck Pierce is a well known Texas Adventure Sailor. He was interested to improve the performance of his Mayfly 14 to make the boat more capable for cruising. Chuck wrote: The leeboard was initially roughly shaped according to Jim's instructions. I tried to get both sides the same, but didn't spend a whole lot of time on it.
My dad and I are building Jim Michalak's Mayfly 14. I'm wondering, is there a product that puts a rough finish into a bright finish? We're planning on bright finishing the decks, but we don't want it to be slippery, and we don't want to put ugly adhesive no-slip tape on the deck surface. ... Model Sailboats. Foster Cartoons. d ...
Sailboats; Mayfly 16 Plans PDF; Mayfly 16 Plans PDF. SKU: JM-MAYFLY16-ID Availability: download after checkout UPC: MPN: $40.00. Current Stock: Quantity: Decrease Quantity of Mayfly 16 Plans PDF Increase Quantity of ... Mayfly 14 Plans PDF. $35.00 Mayfly14 is a straight forward flat bottomed plywood skiff for sailing and rowing. ...