- Unraveling the Art of Boat Ropes: A Comprehensive Guide
When it comes to sailing and boating, one of the most essential components you'll encounter are boat ropes. These versatile tools play a crucial role in the functionality and safety of any vessel. Whether you're a seasoned sailor or a novice boater, understanding the various types of boat ropes, their uses, and how to properly manage them is essential. In this comprehensive guide, we will dive into the world of boat ropes, covering everything from the basics to advanced topics. So, let's untangle the mysteries of boat ropes together.

Types of Boat Ropes
Understanding the basics.
Before we dive into specifics, let's understand the fundamental types of boat ropes and their applications. There are several types of ropes you might encounter on a boat, each designed for a specific purpose.
Boat ropes come in various materials, each with its unique properties. Common materials include:
- Nylon : Known for its strength and elasticity, nylon ropes are ideal for docking and anchoring.
- Polyester : Polyester ropes offer excellent UV resistance, making them suitable for long-term exposure to sunlight.
- Polypropylene : Lightweight and affordable, polypropylene ropes are commonly used for general-purpose tasks.
- Dyneema/Spectra : These high-tech ropes are incredibly strong and lightweight, making them popular for racing and high-performance sailing.
Dock Lines for Boats
Dock lines are essential for keeping your boat secure when moored. Learn how to choose the right dock lines and how to tie them properly to prevent your boat from drifting away.
When selecting dock lines, consider factors such as:
- Diameter : Thicker lines provide more strength and security.
- Length : Ensure your lines are long enough to accommodate various mooring situations.
- Type of Material : Nylon is a common choice for its strength and shock absorption.
- Eye Splice : Many dock lines come with pre-spliced eyes for easy attachment.
Sailboat Rope Guide
Sailboats have an intricate network of ropes and lines. This section provides a detailed guide to the various ropes you'll find on a sailboat and how they contribute to sailing.
On a sailboat, you'll encounter various ropes, including:
- Halyards : These lines raise and lower the sails.
- Sheets : Sheets control the angle of the sails in relation to the wind.
- Control Lines : These ropes manage the sails' shape and tension.
- Standing Rigging : These are the wires and cables that support the mast.
- Running Rigging : Running rigging includes all the lines that can be adjusted while sailing.
Understanding the function and proper use of these ropes is essential for sailboat navigation.
Yacht Cordage
Yachts require specialized cordage due to their size and purpose. Discover the world of yacht ropes and why they are crucial for your vessel's performance.
Yacht cordage often includes high-performance materials like Dyneema and Spectra, known for their strength and low stretch properties. These ropes are essential for handling the considerable forces generated by large sails and high-speed racing yachts.
The Rope Locker: Your Vessel's Lifeline
The importance of proper storage.
Your boat's rope locker holds the key to a safe and organized voyage. Learn how to set up and maintain this critical part of your boat.
The rope locker, often located in the bow of the boat, serves as storage for various ropes and lines. Organizing it efficiently ensures quick access to the right rope when needed. Consider using hooks, hangers, and labeled bags to keep your ropes tangle-free and easily accessible.
The 7 Ropes You Need on a Ship
Essential ropes for safe navigation.
What are the seven essential ropes every ship should have on board? Find out and understand their roles in ensuring a smooth voyage.
On any ship, whether it's a small fishing boat or a massive cargo vessel, several key ropes are crucial for safe operation:
- Anchor Line : Used for anchoring the ship securely.
- Dock Lines : Essential for mooring the ship to a dock or pier.
- Halyards : Raise and lower the ship's sails.
- Sheets : Control the angle of the sails.
- Towing Lines : Used when towing other vessels or objects.
- Safety Lines : Installed as a safety measure for crew members.
- Tie-Down Straps : Secure cargo and equipment on deck during transit.
Understanding the purpose and proper use of these ropes is fundamental for ship safety and efficiency.
Rope Names on a Sailboat
Understanding the Nomenclature
Sailboats have a unique nomenclature for their ropes. Familiarize yourself with the names and functions of these ropes to become a proficient sailor.
On a sailboat, ropes are often referred to by their specific functions and locations. Some common rope names include:
- Main Halyard : Raises and lowers the main sail.
- Jib Sheets : Control the jib sail.
- Cunningham : Adjusts the tension in the luff of the sail.
- Boom Vang : Controls the vertical position of the boom.
- Backstay : Provides tension to the mast.
Understanding these terms and their functions is crucial for effective communication on a sailboat.
Boat Rope Tie-Down Techniques
Securing your boat.
Tying down your boat properly is crucial for its safety during transport or storage. Learn the best techniques for securing your boat with ropes.
When it comes to tying down your boat, consider the following techniques:
- Cleat Hitch : A common knot used for securing ropes to cleats.
- Bowline Knot : Creates a loop that won't slip or loosen.
- Double Half Hitch : Useful for securing ropes to posts or rings.
- Tautline Hitch : Allows you to adjust the tension of the rope easily.
- Figure Eight Knot : Simple and reliable for bundling ropes.
By mastering these techniques, you can ensure your boat remains secure in various situations.
Read our top notch articles on topics such as sailing, sailing tips and destinations in our Magazine .
Check out our latest sailing content:
Maintaining your boat ropes, extending the lifespan of your ropes.
Proper maintenance ensures the longevity of your boat ropes. Get tips on cleaning and caring for your ropes to keep them in top condition.
To maintain your boat ropes, follow these steps:
- Regular Inspection : Check for wear, fraying, or damage.
- Cleaning : Rinse off saltwater and dirt with fresh water.
- Drying : Ensure ropes are completely dry before storing them.
- Storage : Coil ropes neatly and store them in a cool, dry place.
- Avoiding Knots : Don't leave ropes knotted for extended periods.
Safety Tips for Handling Ropes
Ensuring safety onboard.
Safety should always come first when dealing with boat ropes. Discover essential safety guidelines to prevent accidents while handling ropes.
When handling boat ropes, consider the following safety tips:
- Wear Gloves : Protect your hands from rope burns and blisters.
- Watch Your Feet : Avoid tripping hazards by keeping ropes coiled and organized.
- Secure Loose Ends : Prevent ropes from trailing in the water or getting caught in equipment.
- Use Proper Knots : Ensure knots are correctly tied and can bear the load.
- Know Your Limits : Don't attempt to handle ropes beyond your physical capability.
By following these safety guidelines, you can minimize the risk of accidents while working with boat ropes.
Yacht Ropes: A Comprehensive Guide
Specialized ropes for yachts.
Yachts demand a higher level of performance from their ropes. This section provides an in-depth look at the world of yacht ropes, ensuring you make the right choice for your vessel.
Yacht ropes come in a variety of materials, each offering specific advantages:
- Dyneema and Spectra : These high-strength, low-stretch fibers are favored for their performance in racing yachts.
- Kevlar : Known for its exceptional strength and resistance to abrasion.
- Technora : Offers a balance of strength and heat resistance.
- Polyester Blends : Combining the durability of polyester with added strength from other fibers.
Selecting the right yacht ropes is crucial for both performance and safety on the open water.
Ropes on a Sailboat: The Art of Knotting
Mastering knots for sailors.
Knot tying is a fundamental skill for sailors. Explore the art of knotting and learn the essential knots every sailor should know.
Essential Knots for Sailors:
- Bowline Knot : Creates a secure loop at the end of a line.
- Clove Hitch : A versatile knot for attaching ropes to posts or rings.
- Reef Knot : Used to tie two ends of a single line together.
- Sheet Bend : Joins two ropes of different diameters securely.
- Square Knot : Simple and reliable for bundling ropes.
Mastering these knots is essential for sailboat safety and maneuverability.
Ropes on a Boat: Best Practices
Enhancing your boating experience.
What are the best practices for using boat ropes effectively? Discover tips and tricks to make your boating experience safer and more enjoyable.
Best Practices for Handling Boat Ropes:
- Label Your Ropes : Use labels or colored markers to identify the purpose of each rope.
- Keep Ropes Dry : Moisture can weaken ropes over time; ensure they stay dry when not in use.
- Regularly Inspect Hardware : Check cleats, winches, and other hardware for signs of wear.
- Practice Knot Tying : Regular practice helps maintain knot-tying skills.
- Teach Your Crew : Ensure everyone on board understands rope safety and usage.
By incorporating these best practices, you can enhance safety and efficiency on your boat.
Choosing the Right Rope for Your Vessel
Material matters.
Learn how different rope materials impact your boat's performance and longevity.
The choice of rope material depends on factors like:
- Boat Type : Different boats have varying rope requirements.
- Intended Use : Consider whether the rope will be used for anchoring, sailing, or towing.
- Environmental Conditions : Assess the impact of UV exposure, saltwater, and humidity.
- Budget : Different materials come at varying price points.
Understanding these factors will help you make informed decisions when selecting boat ropes.
Length and Diameter
Choosing the right length and diameter of your boat ropes is critical. Find out how to make the perfect selection for your vessel.
Selecting the right rope length and diameter depends on your boat's size and purpose:
- Diameter : Thicker ropes offer more strength, but they can be harder to handle.
- Length : Longer ropes provide flexibility in various situations.
- Sizing Charts : Refer to manufacturer sizing charts for specific recommendations.
Strength and Durability
aUnderstanding the strength and durability of ropes ensures they can withstand the challenges of the sea.
Rope strength is determined by its material and construction. Factors affecting durability include:
- Abrasion Resistance : Critical for ropes subject to frequent wear.
- UV Resistance : Important for ropes exposed to sunlight.
- Stretch : Consider low-stretch ropes for sailing applications.
Advanced Rope Techniques
Splicing ropes.
Splicing ropes is an advanced skill that allows you to create custom-length lines. Learn the art of splicing for versatility in your ropes.
Splicing is the process of joining two ropes together without relying on knots. This technique is particularly useful for creating custom-length lines for specific applications on your boat.
Knot mastery.
Take your knot-tying skills to the next level with advanced knot mastery techniques.
Advanced knot-tying skills are invaluable for sailors. These techniques include:
- Bend Knots : Joining two ropes securely.
- Loop Knots : Creating secure loops in ropes.
- Stopper Knots : Preventing ropes from slipping through openings.
- Decorative Knots : Enhancing the aesthetics of your boat ropes.
Rope Repair
Knowing how to repair your ropes can save you money and keep your boat in top shape.
Boat ropes can suffer wear and tear over time. Learning basic rope repair techniques can extend the life of your ropes and save you from unnecessary replacements. Common repairs include splicing, whipping, and patching frayed sections.
In conclusion, boat ropes are the unsung heroes of every maritime journey. They secure, guide, and enable us to navigate the open waters safely. By understanding the types, uses, and maintenance of boat ropes, you can embark on your boating adventures with confidence.
So what are you waiting for? Take a look at our range of charter boats and head to some of our favourite sailing destinations.
I am ready to help you with booking a boat for your dream vacation. Contact me.

Denisa Kliner Nguyenová
- THE PRINCESS PASSPORT
- Email Newsletter
- Yacht Walkthroughs
- Destinations
- Electronics
- Boating Safety
- Ultimate Boating Giveaway

How To Repair Minor Fiberglass Damage on Your Boat
- By Lenny Rudow
- September 16, 2024
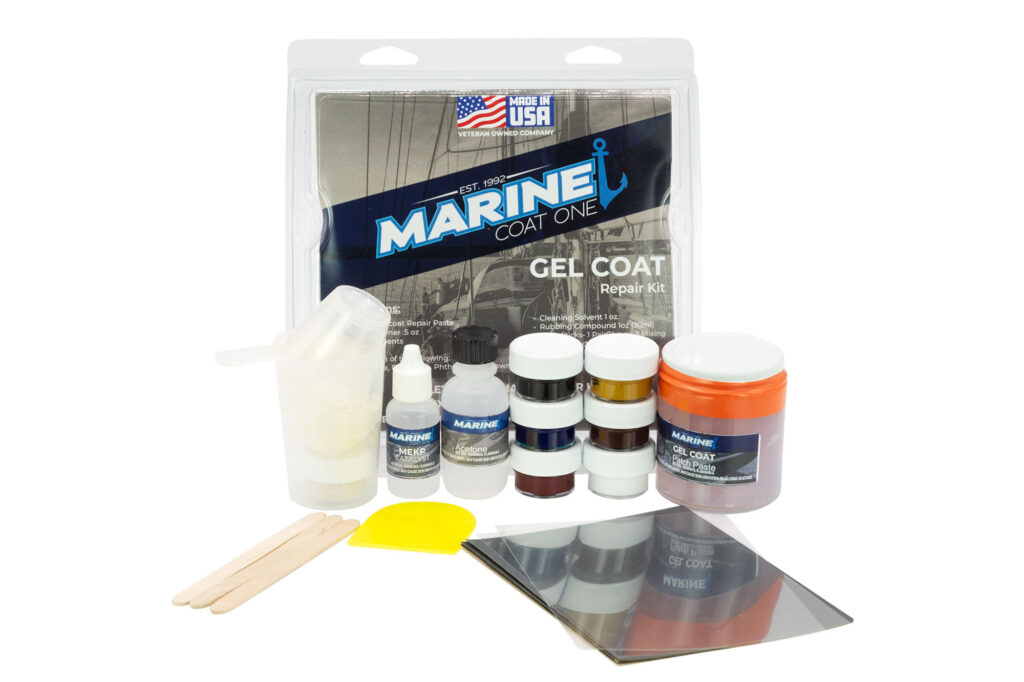
All boaters will bump pilings, kiss rubrails or make an errant screw hole here or there, and those are just a few of the ways minor fiberglass damage can occur onboard. Anytime there’s significant damage to a vessel’s fiberglass, you’ll want to call in a pro, but fixing the minor stuff is actually easy and straightforward. If the damage is limited to the gelcoat, and you know there are no structural issues to worry about, cosmetic repairs can be made in a matter of minutes.
Fixing Chips, Dings and Holes in Fiberglass Gel Coat
Stage one in fixing this type of fiberglass damage is to clean out the divot. This includes removing any loose chips or fragments, sanding the surface with a fine-grit sandpaper, then wiping the surface down with Interlux 202 or acetone to remove all contaminants. If you’re filling in an old screw hole, be sure to sand the edges and roll up a small piece of the sandpaper so you can insert into the hole and sand the inside edges too. Do the same with a rag and the 202 or acetone to clean it out. Now, you’re ready to fill in that blemish.
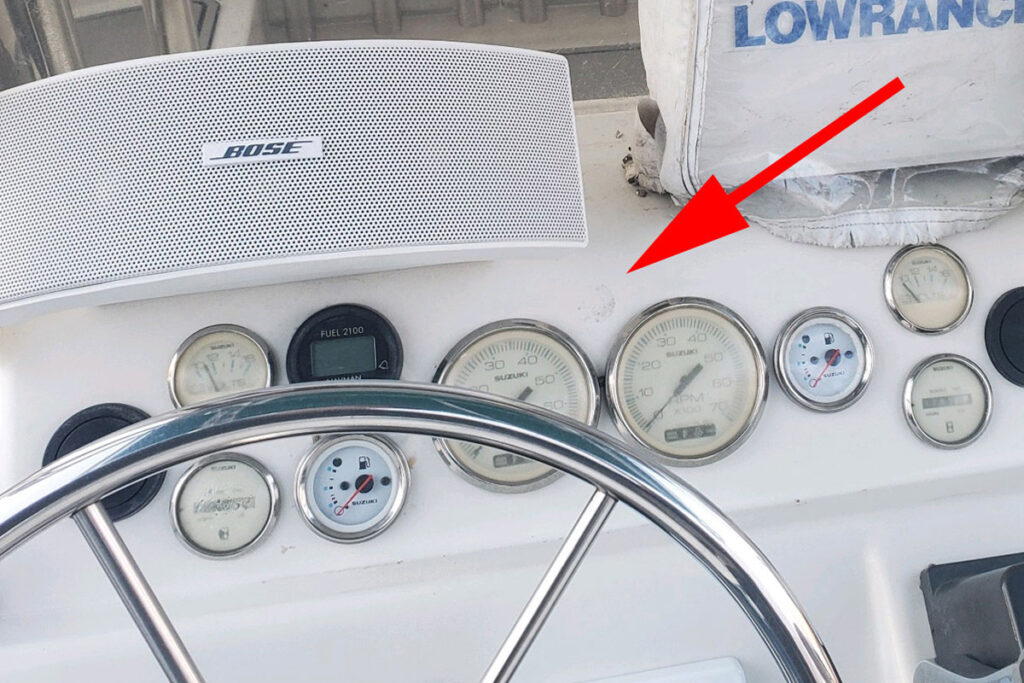
Gelcoat paste will do the trick, and you can use a regular putty knife to create a smooth surface that fills all the gaps. But there’s a complicating factor: you’ll need to color-match the paste with your boat’s original gelcoat. There are literally hundreds of shades and tones of gelcoat, and you’ll have to custom mix your own batch. Start with a neutral white gelcoat paste, then add small amounts of pigment and mix it in. Most gelcoat repair kits will come with several coloring agents allowing you to mix up just about any combination, so if your boat is anything but plain white, it’s usually best to get a kit rather than buying a single pigment and trying to match the correct shade.
Here’s the kicker: when the gelcoat dries, the color often changes slightly. So, what looks like a perfect match upon mixing may turn out to be slightly off when it hardens up. To combat the issue, carefully mix several batches with slightly different paste/pigment ratios that create slightly different shades, allow them to dry, then compare them with your boat’s existing gelcoat. When you find a match you can live with (getting a perfect match is virtually impossible), remix it. Now, you’re ready to spackle it into the damaged area. Make sure to overfill it just a bit and don’t leave any air pockets. When you’re satisfied, cover the gelcoat paste with plastic wrap or a similar film (often included in kits) because gelcoat cures best when it’s not exposed to the air.
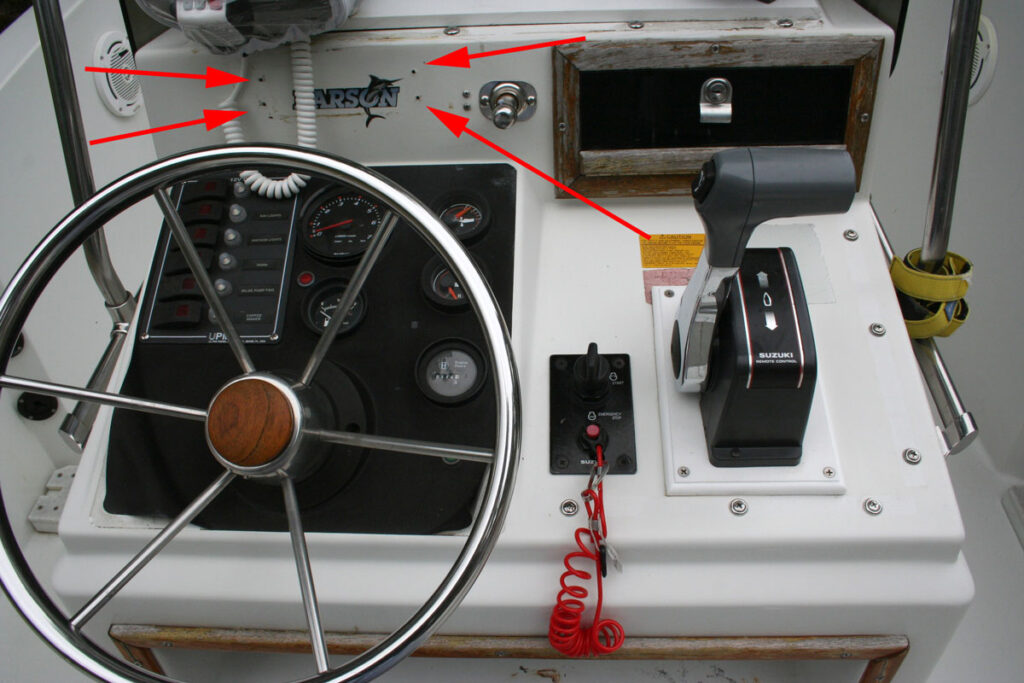
After it dries completely, lightly sand the area with extra-fine sandpaper until the overfilled area matches up with the pre-existing surface. Then wet-sand with a super-fine grit sandpaper until the surface is completely smooth. Finally, give the area a couple of coats of paste wax.
Fixing Cracks in Fiberglass
Fixing cracks is a bit tougher, because they don’t have enough surface area for the gelcoat paste to adhere; you can’t just smoosh it in there and hope for the best. First, you need to open up the cracks with a Dremel tool. Use a silicon carbide or tungsten carbide bit shaped like a cone, and be sure to grind deep enough to expose the uncracked fiberglass beneath. Keep in mind that adding lots of pressure to a Dremel won’t produce the best results. Instead, run it along the cracks multiple times with light pressure.
When the cracks have all been ground away, sand the exposed areas with fine-grit sandpaper to remove any burrs or jagged edges. Then wipe down all the areas with Interlux 202 or acetone to eliminate contaminants.
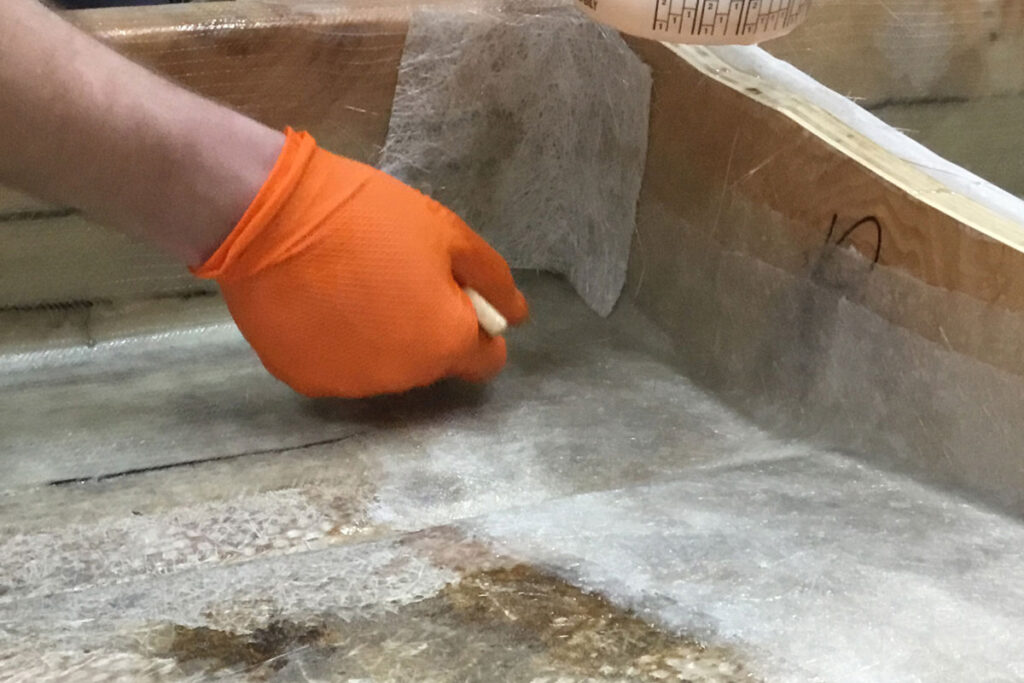
From here on out the repair process is the same as for chips and dings. However, if the cracks surround a high-stress area like the attachment point for a rail or a T-top support, there’s a good chance the cracks will reappear over time. It may be necessary to add backing plates or some other form of structural support to prevent a recurrence.
What about making repairs when the raw fiberglass cloth beneath the gel coat has been damaged? At that point, it should really be considered major as opposed to minor. So, if shards of matt or woven roving are showing call in the pros.
- More: Boat Repair , Fiberglass , Gear , Maintenance , Yacht Maintenance , Yacht Repair

Sunreef Yachts and North Sails Champion Eco-Friendly Build Materials

Marine-Friendly Sunglasses

Garmin Quatix Upgrade

Dockmate’s Dynamic Positioning Upgrade

Superyacht For Sale: Amels 180 “Galene”

Alia Yachts to Debut SAN Superyacht in Monaco
Top Bar Harbor Maine Sights For Visiting Cruisers
Always In Style: Ocean Alexander 85E For Sale

- Digital Edition
- Customer Service
- Privacy Policy
- Terms of Use
- Email Newsletters
- Cruising World
- Sailing World
- Salt Water Sportsman
- Sport Fishing
- Wakeboarding

888-596-7673
For All Your Cordage Needs - Yachts, Ships & More
- 3 Strand Nylon
- Double Braid Nylon
- 8-Strand Nylon
- Mega Braid 12 Strand
- Double Braid Polyester
- High Performance Line
- AmSteel® Blue 12 Strand
- Purple Plasma Rope
- Manila Rope
- Tylaska Snap Shackles
- Anchor Chain
- Dyneema Soft Shackles
- Mega Yachts
- Pleasure Marine
- Commercial Marine
- Military & Government
- Architectural & Decorative
- Industrial and Utility
- Choosing Dock Lines
- Rope Glossary
- Splicing Services
- Conversion Chart
- Company Brief
- Contact / Inquiries

utility & industrial
Commercial marine, yacht & mega-yacht, military & goverment, ropes and lines for yachts & more – all your cordage needs, rope inc (aka rope works) has the buying power and expertise of a national distributor, with the personal attention and in-house splicing and customization, of a local chandlery..
Offering New England Ropes, Puget Sound Ropes, Samson Rope Technologies, Southern Ocean Ropes and other premium rope manufacturers.
We provide cordage of all sizes and types used in yachting and recreational boating , commercial marine , building construction and services , military and government applications, industrial uses , and architectural applications. We offer a wide selection of natural fiber rope (manila), synthetic fiber (nylon and poly) and wire ropes. We regularly supply cordage and wires for decorative building applications, including steel cables and fittings.
Rope Inc. offers custom splicing for dock lines and mooring lines, running rigging and anchor gear, as well as leather and fabric chafe gear for yachts – large and small. We can provide the experienced guidance and solutions a customer may require for demanding applications. By consulting with a Rope Inc specialist, we can provide complete package solutions which are tailored specifically to your needs and consolidated in our Fort Lauderdale, Florida warehouses .
We are the Rope and Cordage EXPERTS

888-596-7673 +1 954-525-6575
architectural
Pleasure marine boating & sailing, recreational, construction & safety.

Rope Inc 268 SW 33rd Street Fort Lauderdale, Florida 33315 ( map )
We’re Here To Help You 888-596-7673 +1 954-525-6575 +1 954-525-5887
Home • Terms of Service • Privacy Policy Copyright © 2020-2022. All Rights Reserved – Rope Works Inc .
- Practical Boat Owner
- Digital edition

Rope holding issues solved: How to repair rope clutches and when to replace them
- July 21, 2021
We have all encountered clutches that won’t hold a rope properly, but figuring out the best solution is not always obvious, writes Rupert Holmes

Purchase systems that can be assembled quickly and cheaply using low friction rings mean many tasks that once required a clutch can now be handled by a decent cam cleat. Photo: Rupert Holmes
The first step is to examine the existing cams. Are they the correct size for each line? And how badly are they worn? Wear can have a massive effect on the amount of load a clutch can hold without the rope slipping. And once the line does start to slip the rate of wear accelerates rapidly.
Fortunately replacement cams are available for all the major brands of clutches, generally at a small fraction of their replacement cost. Unless a boat gets very little use, if clutches are more than 10-15 years old there’s every chance the cams could do with replacement.
On raceboats and very large cruising yachts it’s also worth checking that the cams are matched to the type of rope used. Needless to say, the higher the load the more important your clutch’s holding ability becomes.
Article continues below…

Best boat rope – the right rope for mooring lines, halyards and sheets
At this time of year we often start to put into place plans for upgrading our boats for the new…

How to restore a manual windlass as a DIY practical project
Part of PBO’s DIY from Home series: browse all related ‘in the workshop’ articles here I don’t object to the…
Clutch manufacturers have done much work to develop new materials such as ceramic coatings that hold very high tech lines more firmly.
Sometimes replacing lines can cause problems: your old halyard might have had an outer cover that had been abraded into a rough surface through years of use. New, modern rope is likely to be shiny and more slippery and less easy for the clutch to grip.
However, the problem can also manifest as a result of upgrading to Dyneema lines – the lack of stretch increases peak loads on the halyard. The solution is to splice an additional length of outer cover tube over the rope, extending for a couple of feet each side of the clutch.
This adds extra diameter that gives more material for the clutch to bite on. It can also be made of a material such as Technora, which has a rough surface that adds more friction.
Ever wondered how to make rope? Check out this video of a traditional ropewalk device
Adding extra clutches
There are many reasons for adding extra clutches, including setting up mainsail reefing that can be handled from the cockpit, or easily rigged boom preventers.
Before starting work, however, it’s worth reassessing the existing systems – you may find re-rigging other lines will free up spare clutches while making those systems operate more smoothly.
In a deck layout from 30 years ago a kicking strap, for instance, would most likely have had a 4:1 purchase before being led back to a clutch. Today, it’s far more common to see that purchase being increased to 16:1 or 24:1 using a cascade arrangement with two low friction rings, which means a winch is not needed for tensioning and a decent cam cleat will happily hold the load.
Equally, it used to be common for clew outhauls to be taken to a clutch, but adding a 4:1 cascade should enable it to be taken to a cam cleat on any boat under 40ft. Spinnaker pole downhauls can also generally be taken directly to a cam cleat.

The Boa Base fits neatly into the footprint of Spinlock’s clutches, enabling a set of textile clutches to fit beneath a set of standard ones
Double-decker clutches
If additional clutches are needed, but deck space is in short supply, then Loop’s Boa Base may be exactly what’s needed. This is a brilliant idea that enables two layers of clutches to be stacked vertically by adding housings compatible with Cousin Trestec Constrictor textile clutches underneath standard units, thereby potentially doubling the number of clutches that can be fitted in a given space.
The Boa Base uses the same fixings as Spinlock’s double, triple and quadruple format XAS and XTS/XCS series clutches, which simplifies installation. They also work very neatly with stacked ‘double decker’ deck organisers.
Prices start from €124. Find out more at: upffront.com
Shop by Material
Shop by construction, shop closeouts.
Running Rigging
- Standard Rigging
Rigging Inspection
Refit & Service
Custom Splicing Order
- OEM/Manufacturing
- Small Business Discount
- Wholesale Account
- Davey & Company
- Langman Rope
- Marlow Ropes
- New England Ropes
- Samson Rope
- Sterling Rope
- Teufelberger
- Veteran & Active Duty Discount
- First Responder Discount
- Universities, Camps, Non-Profits
- Government & Municipality
- Shipping & Returns
- RopeFest 2024
Full Service Rigging Shop
Line Fraying: How to Keep Rope Ends from Unravelling

Line fraying is a common problem on sailboats, especially with woven cords, though it's easy to prevent.
Woven cord unravels on the ends when twisted against the weave or agitated. With synthetic rope such as nylon, the easiest way to repair fraying is to melt the ends with a lighter. Natural rope, such as cotton, can be repaired by sealing the ends in waterproof glue.
In this article, we'll cover why rope frays and how to fix fraying, along with how to prevent new lines from fraying in the future. We'll overview how to repair and prevent fraying using different methods such as tape, heat, and epoxy.
This article is based on tips from local experienced sailors, along with the recommendations of rope and cord manufacturers. We also tested several popular anti-fraying methods and published our results below.
Table of contents
Why does Rope Fray?
Rope frays when the smaller woven fibers that comprise it come unraveled. This occurs over time as the line ages, or instantly if it's cut improperly. Normal wear and tear will cause almost all ropes to fray on the ends eventually.
Synthetic rope (such as nylon) is often the worst offender, as the small plastic strands that make up the larger diameter rope are often stiffer than natural materials. Hemp rope also has a tendency to fray, though hemp is much less common on sailboats.
How to Fix Frayed Synthetic Rope

The most common marine rope material is nylon, which is synthetic plastic. Some less premium types of nylon cord are also the easiest to fray, as are other materials such as polypropylene. Nylon cord is woven from numerous strands of plastic material. On their own, they're not very strong, and they're also relatively stiff.
The stiffer the strands, the more they tend to fray. The outer strands of a nylon rope are braided like a honeycomb to make a flexible tube. Inside the tube is additional braided nylon, which makes up the load-bearing part of the rope. Fraying generally causes the outer cage to unravel and causes the braided core to come unwound, so to speak.
Nylon cord is the easiest to fix when frayed, as it's made of plastic and melts easily. Before applying heat, cut the frayed end of the nylon cord, so you have a clean end to work with. Next, simply apply the flame of a lighter to the end of the rope and move it around evenly.
Don't burn the rope for too long, as it'll be unnecessary. It's normal for the end of the rope to blacken a bit, but you don't need to severely char•it to prevent fraying.
How to Fix Frayed Natural Cords and Rope
Natural cords and rope, such as cotton and hemp, aren't as easy to fix when frayed. However, you can still fix it with a few extra tools and materials.
Virtually all kinds of non-synthetic rope can be fray-proofed or repaired with a piece of electrical tape and a lighter. Simply pull off a piece of electrical tape and wrap it tightly around the end of the rope. Make sure that the end of the tape is flush with the end of the rope. Then, use your lighter to melt the edge of the tape to the rope. This will form a permanent bond, and you can leave the tape in place permanently after.
Best Way to Melt Rope and Tape
To test these methods, we went to the hardware store and bought a few pieces of common sailing rope, some electrical tape, and a box of matches. We already had a lighter on hand, along with some other types of tape.
Does Duct Tape Work for Fixing Frayed Rope?

We went to the hardware store to see if duct tape could be used in place of electrical tape to fix frayed rope. We tried Duck-brand tape, generic duct tape, and standard electrical tape. We cut a 3/4-inch-wide section of duct tape to match the width of the electrical tape.
Next, we wrapped each kind of tape tightly around the ends of a cotton rope. We briefly applied a flame to the taped ends and found that the electrical tape was far more effective.
Duct tape has a tendency to char rather than melt, which makes it too easy to ‘overcook,' so to speak. On the other hand, electrical tape melts easily and doesn't burn as easily. Additionally, electrical tape was stronger and didn't fray or break when manipulated.
The conclusion we drew is that duct tape, and Duck brand tape can be used in a pinch, but it's much better to use standard electrical tape. Brand and width didn't seem to matter, though it's a little easier to work with tape that's 3/4-inch or wider.
Other Ways to Fix Frayed Rope
The easiest way to prevent a frayed rope from unraveling completely is to tie a knot close to the end. Unfortunately, there are many places on a sailboat where tying a knot isn't possible, like if the rope runs through a grommet.
If you can't melt the rope or use the tape method, the next best option is to dip the end in waterproof glue or epoxy. You can tape it beforehand to keep the fibers from separating When they soak up the glue. After, you can leave the tape on or remove it.
Anti-Fray Glue
Some companies produce glue that's specifically formulated to use on all kinds of rope. The most popular is Dip-It Whip-It, which is manufactured by Star Brite .
Star Brite Dip-It Whip-It is an excellent option because it works on all kinds of rope. Additionally, Dip-It Whip-It can be applied prior to cutting the rope with all included applicator brush.
How to Apply Anti-Fray Glue
Applying Dip-It Whip-It and similar products is easy and takes only five minutes to dry. Start by painting about an inch of the rope all the way around, and give it five to ten minutes to harden completely. Then, cut the rope in the middle of the painted area. At this point, the glue will keep the outer fibers of the rope from coming apart and unraveling the middle.
How to Prevent Rope from Fraying
To prevent a rope from fraying, melt or glue the ends immediately after cutting a fresh piece. It should become a habit every time you cut a new piece of rope, and it usually lasts for the lifetime of the rope.
Fraying that occurs further down the rope is much more difficult to prevent. If your rope begins to fray on the sides, it is probably a sign that the rope should be replaced entirely.
Related Articles
Daniel Wade
I've personally had thousands of questions about sailing and sailboats over the years. As I learn and experience sailing, and the community, I share the answers that work and make sense to me, here on Life of Sailing.
by this author
Most Recent

What Does "Sailing By The Lee" Mean?
October 3, 2023

The Best Sailing Schools And Programs: Reviews & Ratings
September 26, 2023
Important Legal Info
Lifeofsailing.com is a participant in the Amazon Services LLC Associates Program, an affiliate advertising program designed to provide a means for sites to earn advertising fees by advertising and linking to Amazon. This site also participates in other affiliate programs and is compensated for referring traffic and business to these companies.
Similar Posts

How To Choose The Right Sailing Instructor
August 16, 2023

Cost To Sail Around The World
May 16, 2023

Small Sailboat Sizes: A Complete Guide
October 30, 2022
Popular Posts


Best Liveaboard Catamaran Sailboats
December 28, 2023

Can a Novice Sail Around the World?
Elizabeth O'Malley
June 15, 2022

4 Best Electric Outboard Motors

How Long Did It Take The Vikings To Sail To England?

10 Best Sailboat Brands (And Why)
December 20, 2023

7 Best Places To Liveaboard A Sailboat
Get the best sailing content.
Top Rated Posts
© 2024 Life of Sailing Email: [email protected] Address: 11816 Inwood Rd #3024 Dallas, TX 75244 Disclaimer Privacy Policy
Repair : Ropes: Repair before they break
Michael Rinck
· 16.05.2018
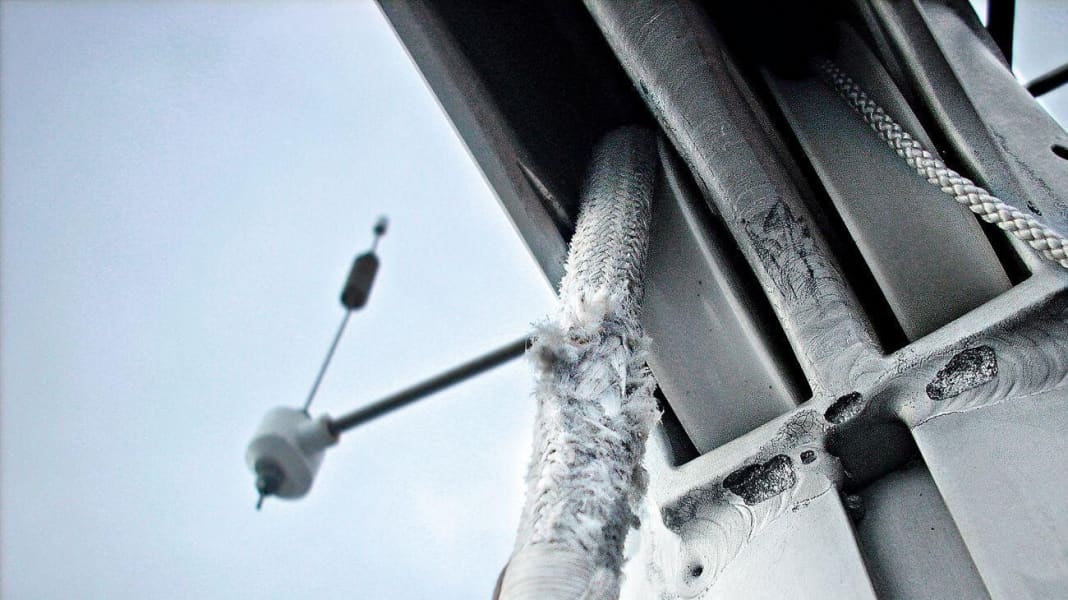
Even if the halyard still looks like new, the area directly behind the shackle is often affected. This is because this is where the rope works on the pulley when sailing or chafes at the exit. The danger here, even if the sheath of a Dyneema halyard is hardly carrying any load, is that as soon as it tears, the remnants could pile up and get jammed in the pulley when the halyard is fished. In this worst-case scenario, the sail could no longer be recovered. So there is no question: action is needed.
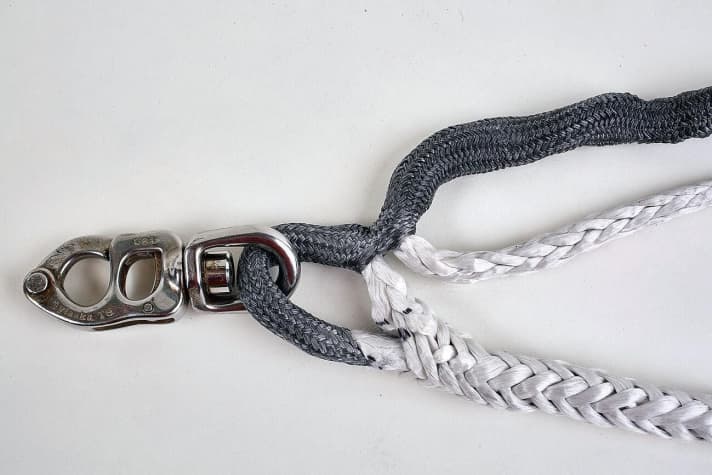
Depending on where sailors are currently travelling with their yacht, there are various ways to solve the problem:
The instructions in YACHT 9/2018 - available in the DK shop - cover everything from emergency repairs with special adhesive tape to a quick splice at sea and professional halyard repairs. Or you can download the instructions directly via the link below.
Cordage: splicing, repair (pdf)
Most read in category DIY

- Subscribe Now
- Digital Editions

How to fix frayed mooring ropes
Aston martin’s £1.26m superboat revealed, mbm’s orkney longliner 2, on board globetrotting grey wolf.

- Forums New posts Unanswered threads Register Top Posts Email
- What's new New posts New Posts (legacy) Latest activity New media
- Media New media New comments
- Boat Info Downloads Weekly Quiz Topic FAQ 10000boatnames.com
- Classifieds Sell Your Boat Used Gear for Sale
- Parts General Marine Parts Hunter Beneteau Catalina MacGregor Oday
- Help Terms of Use Monday Mail Subscribe Monday Mail Unsubscribe
How to replace the rope clutch on a Hunter 336
- Thread starter SVAngelina
- Start date Aug 31, 2023
- Tags rope clutch
- Hunter Owner Forums
- Ask A Hunter Owner
Attachments

Hello Below
rgranger said: So the "backing" plate/nut is actually embedded in the deck. Click to expand
I have a 336 but have not worked on the specific area you are talking about but generally, for instance all the stanchions, are into a tapped, embedded Aluminum plate. I did find that one of my stanchions had nuts on the underside but this had been "fixed" and they must have stripped out the plate. be very careful when trying to remove the fasteners, I had to extract one from a different stanchion when I stripped it. now I use a manual impact screwdriver to get the bolts free: Amazon.com here is Facebook group for the 336/340 which is very helpful
Hello Below said: Agreed but it’s just as likely to have the threads tapped directly into an aluminum plate. Click to expand
Techstyle said: I have a 336 but have not worked on the specific area you are talking about but generally, for instance all the stanchions, are into a tapped, embedded Aluminum plate. Click to expand
A Helicoil is good there too if the threads strip. the manual impact driver is a real help, as Techstyle noted.
If there is no way to access nuts under the clutch, it is a good bet that the screws are screwed into the aluminum plate embedded in the glass. Try backing out one of the screws and see what happens. Hopefully they used some sort of lubricant on the screws to prevent dissimilar metal issues. Greg
Crazy Dave Condon
Former Hunter dealer who use to sell your boat. @rgranger is correct about the aluminum plate embedded in the fiberglass which is drilled and tapped. Be aware 5200 was probably used as a sealant which is not recommended. 4200 or a good sealant is recommended other than 5200 Crazy Dave
Thank you all! I’ll give it a try and report back - with pictures.
Can't you just replace the broken lever/handle , work all done from top? That's what I did for my h326. There are 2 long smallish bolts that can be remove from the clutch assembly for access to remove levers/handles. The rod holding the levers should be able to be tap out.
Thanks Ken13559…. I’ll look for the replacement handle first. The new triple clutch is about $250 at Defender (new model XAS), so I’ll check the price of the handle (legacy model XA).
Congratulations on the replacement. If you cannot figure out, Al Fooks and Joe Kerr are former Hunter employees who built your boat now working for the Forum Store on this site.
SVAngelina said: I want to replace the starboard triple rope clutch on my Hunter 336 (one of the handles broke). I’ve seen videos online on how to do this on other boats and seems simple enough if you can access the rope clutch from beneath, as there are nuts that you need to access in order to remove the old clutch and install the new one. I don’t see a way to access the bottom of the clutch at all (see pictures attached), so I am wondering if in the case of the 336, the clutch is only glued to the deck….? There is only small opening to access the winch on both the port and starboard sides, but no access to either rope clutch. Has anybody replaced this? View attachment 219437 Click to expand
chp said: Just replace the handle. Click to expand
SVAngelina said: The key thing was to align the screw holes and mark where the new rope clutch sits before applying the adhesive. Click to expand
Just wanted to thank everyone for a really useful set of posts! I was wondering about access to the clutches on my 2004 36 and I hope/assume they will be installed in pretty much the same way, so this is good info for me. Now I have to think about replacing one of the 3 clutch units with a 4 clutch setup.
George Braun
AndyL said: Just wanted to thank everyone for a really useful set of posts! I was wondering about access to the clutches on my 2004 36 and I hope/assume they will be installed in pretty much the same way, so this is good info for me. Now I have to think about replacing one of the 3 clutch units with a 4 clutch setup. Click to expand
- This site uses cookies to help personalise content, tailor your experience and to keep you logged in if you register. By continuing to use this site, you are consenting to our use of cookies. Accept Learn more…
Yachting Monthly
- Digital edition

Cleats, clutches and jammers: which to use and when?
- Graham Snook
- July 29, 2022
A variety of deck hardware devices will hold a line fast, but when should one be used and not another? Graham Snook explains
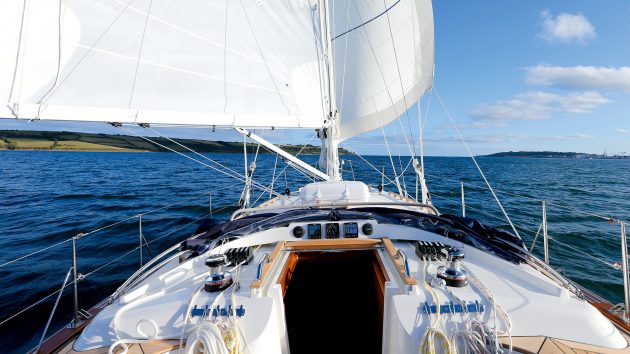
Sailing would be nothing without rope, but rope would be of little use if there was no way to fix, belay or secure it. Early sailors must have quickly realised holding rope for long periods was no fun – something many yacht racers have yet to understand – and making off sheets and halyards freed their hands to do other things. With the advent of rope, came rope-holding technologies.
There may be some who abhor the thought of Yachting Monthly referring to lines as rope, or you may have sailed with someone who proclaims ‘there are no ropes on a boat’. Ignoring the bell rope, bolt rope and foot rope there is rope. Lines are rope, as are halyards, sheets and warps. When we talk about rope-holding technology, we are securing the product ‘rope’ , not a specific line.
While we’re righting misnomers, many people, including me, will have been calling clutches ‘jammers’, but a clutch can be released under load while a jammer cannot. That said, many Australian sailors, including gear manufacturer Ronstan, also refer to clutches as jammers, and Karver’s KJ jammer can be used as a clutch!

Cam cleats and constrictor clutches are used to control all lines on IMOCA 60 Hugo Boss
Simple cleats
For lightly loaded control lines (up to 150kg) used without winches, it’s possible to use clam cleats, jam cleats or cam cleats if they are up to the job.
As the loads increase, and unless you have a winch for each line, you’ll need a rope clutch or jammer ahead of the winch to hold the load of one line while you winch in another.
The mechanisms used to secure the ropes vary between manufacturers and even between ranges – depending on the loads involved. But they all operate by gripping the line as much as possible while minimising damage to the rope.
A line passing through the device in the ‘open’ position can travel in and out. Once the mechanism is closed or locked, the line can be pulled in but will not go out. Once the clutch or jammer is locked it’s always best to ease the load on the winch gradually until you know the line is secured – poorly adjusted clutches can fail to secure the line.
When pulling a line in through a clutch, while it’s usually possible to do so with a closed clutch, having the clutch open will reduce wear on the gripping surface, saving the jaws of the clutch and the fibres in the rope and making it significantly easier to pull the line through.
Before a jammer can be released, the load has to be taken off it by winching the line taut. A clutch, on the other hand, can be released under load – handy for a speedy spinnaker takedown. But, as James Hall from Spinlock explained, ‘just because you can do it, it doesn’t mean you should. Our XXC Powerclutch can release at over 2,300kg but repeatedly releasing a rope with over two tons of load is not good for boat, rope or crew.’

The lead from the clutch to the winch should be as close to straight as possible, unlike in this picture
Clutch vs Jammer
Most boats from 7.5-11m (25-40ft) will have a range of different-sized clutches depending on the loads and the rope diameters in use. As boats get bigger you start to see more jammers to take the larger loads. Choosing between a clutch and a jammer will mostly depend on the working load it will experience, your line thickness, and its purpose. For very high-load applications and lines you don’t want to be released unexpectedly, a jammer is the best choice.
There is less risk of damage, and a high-loaded line cannot be accidentally released, but you rarely see these loads on sub 40ft yachts so most will opt for a clutch, and caution.
Lines become thinner under load and with age, so if you have an 8mm line and the choice of a clutch that takes 6-8mm or 8-10mm opt for the smaller clutch if its maximum load is up to the job – it will grip the line better. Also, if you need to replace a clutch that’s on a continuous line (such as a furling line for an in-mast furling system) look for clutches for endless lines. These have split fittings that can be fitted without parting and re-splicing the line. Some designs allow the clutch to be side-mounted which is handy if the clutch is to be mounted to an upright surface such as the side of a coachroof or coaming.

Clutches allow for many lines to be taken to a single winch, giving you all the lines at your fingertips
The layout of your deck needs to be considered when fitting a new clutch or jammer. Clutches are available individually or in clusters of two, three, four or five. The lines have to enter the body of the device as straight as possible. Likewise, the exit angle to the starboard side of the winch drum must be as fair as possible too. If there is upwards or sideways loading this should be taken by a deck tidy or fairlead/bullseye, not the clutch or jammer itself.
Some clutches and jammers offer the option of operating remotely using thinner control lines. The advantages of this are the length of the highly loaded line is shorter; so less stretch and the ability to locate the hardware in an inaccessible location such as a mast top jammer for a racing yacht’s main halyard.
For the low-load applications any suitable-sized A4 stainless steel bolts will do, but for mid- to high-load use, many devices will come with suitable fixings for the maximum load.

threaded metal backing plates will take loads of the clutches rather than the cored deck
It’s very important that wherever you attach the clutches or jammers, the deck needs to be able to withstand the combined load of all the jammers and should have suitable backing plates inside. Most boats have a cored or sandwich deck that will need cutting away and sealing inside to accommodate the backing pad. See our recommended method for doing this on p83.
Maintenance
Jammers and clutches don’t need a lot of maintenance, just a hose down after use will help rid the clutch of rope fibres, debris the rope has picked up, plus any grit or salt. When you service your winches annually (which of course you do) it’s worth inspecting your clutches and lightly greasing any bearing surfaces, all of which will be identified in the manual.
Finally, if you plan to upgrade or replace your lines, bear in mind your poor rope clutches – they might not be designed for the thinner line diameter, higher loads or the fancy slippery outer braid on the rope. Luckily, spare parts or upgrades are easy to come by, so if the jaws get worn, polished or lose their grip they can usually be replaced.
Enjoyed reading this?
A subscription to Yachting Monthly magazine costs around 40% less than the cover price .
Print and digital editions are available through Magazines Direct – where you can also find the latest deals .
YM is packed with information to help you get the most from your time on the water.
- Take your seamanship to the next level with tips, advice and skills from our experts
- Impartial in-depth reviews of the latest yachts and equipment
- Cruising guides to help you reach those dream destinations
Follow us on Facebook , Twitter and Instagram.

New Marine Travel Lift!
55,000 lb. capacity sailboat extension-top beam | remote control 2' extended overall height, quality boat repairs in mandeville.
Pontchartrain Yacht Works is located in Mandeville, north of New Orleans on the northshore of Lake Pontchartrain. We want to be your one-stop shop for boat repairs in our full service yard. We are locally owned and operated on Bayou Castine with easy access to all marinas and Lake Pontchartrain. We take pride to complete repairs the right way whether it is a bottom job, repairs or just a haul out you can count on our Quality minded team!
Diagnostics and Repairs On-Site
When you suspect you have a problem with your boat or trailer, you can call our team.
Marine Essentials
Pontchartrain Yacht Works also offers retail items for sale, such as rigging, plumbing and decking hardware, maintenance and cleaning items, boat repair materials, electrical parts, line, rope, and more! We have also amassed a collection of salvaged parts, some of which are usable at a fraction of the price of new. You may find an obscure piece you haven’t been able to find anywhere else!
Contact our team any time you have an issue. We are happy to offer our professional, seasoned expertise to ensure your boat is operating at its best.
- New Sailboats
- Sailboats 21-30ft
- Sailboats 31-35ft
- Sailboats 36-40ft
- Sailboats Over 40ft
- Sailboats Under 21feet
- used_sailboats
- Apps and Computer Programs
- Communications
- Fishfinders
- Handheld Electronics
- Plotters MFDS Rradar
- Wind, Speed & Depth Instruments
- Anchoring Mooring
- Running Rigging
- Sails Canvas
- Standing Rigging
- Diesel Engines
- Off Grid Energy
- Cleaning Waxing
- DIY Projects
- Repair, Tools & Materials
- Spare Parts
- Tools & Gadgets
- Cabin Comfort
- Ventilation
- Footwear Apparel
- Foul Weather Gear
- Mailport & PS Advisor
- Inside Practical Sailor Blog
- Activate My Web Access
- Reset Password
- Customer Service

- Free Newsletter

Blue Jacket 40 Used Boat Review

Catalina 270 vs. The Beneteau First 265 Used Boat Match-Up

Ericson 41 Used Boat Review

Mason 33 Used Boat Review
How to Create a Bullet-Proof VHF/SSB Backup

Tips From A First “Sail” on the ICW

Tillerpilot Tips and Safety Cautions

Best Crimpers and Strippers for Fixing Marine Electrical Connectors
Polyester vs. Nylon Rode

Getting the Most Out of Older Sails
How (Not) to Tie Your Boat to a Dock
Stopping Mainsheet Twist
Fuel Lift Pump: Easy DIY Diesel Fuel System Diagnostic and Repair
Ensuring Safe Shorepower

Sinking? Check Your Stuffing Box

What Do You Do With Old Fiberglass Boats?
Boat Repairs for the Technically Illiterate

Boat Maintenance for the Technically Illiterate

Whats the Best Way to Restore Clear Plastic Windows?
Stopping Holding-tank Odors
Giving Bugs the Big Goodbye

Galley Gadgets for the Cruising Sailor

The Rain Catcher’s Guide

Sailing Gear for Kids

What’s the Best Sunscreen?

UV Clothing: Is It Worth the Hype?

Preparing Yourself for Solo Sailing

R. Tucker Thompson Tall Ship Youth Voyage

On Watch: This 60-Year-Old Hinckley Pilot 35 is Also a Working…

On Watch: America’s Cup

On Watch: All Eyes on Europe Sail Racing

Dear Readers
- Sails, Rigging & Deck Gear
Making Sail Repairs Last
Glues and tapes for fixing laminated sails..
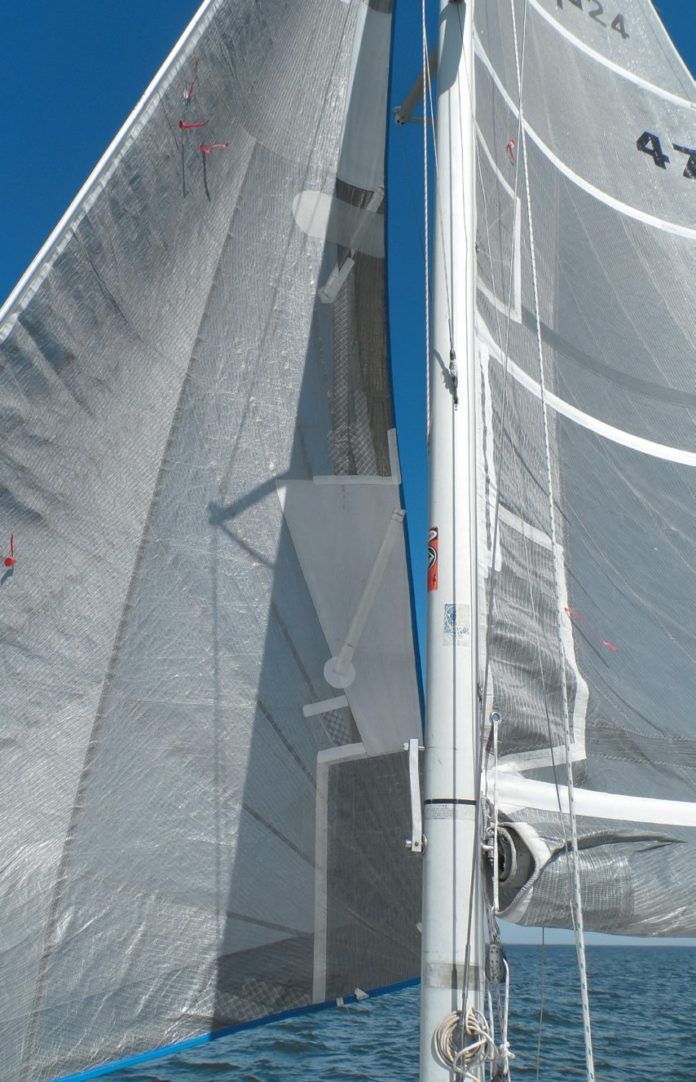
Polyester has long been the workhorse sail fabric; durable, easy to sew and handle, and relatively stretch resistant. It is also relatively easier to repair (see Sail Repair Tapes vs. Glues , PS November 2017). Racers needed something that was lighter and held an aerodynamic shape better, and so laminate sails were born, using Mylar films and non-stretch fibers such as carbon and Kevlar.
The new sails hold shape magnificently, but they experience entirely different failure modes, and the materials used to put them back together are more likely to be adhesives and tapes rather than thread and sewing machines. In fact, many of the repairs we performed originated at an unreinforced stitch line, where a line of holes created a tear-at-the-dotted-line seam. The word for the day is glue.
A new-to-us boat came with a large wardrobe of sails with every sort of damage imaginable: Tears parallel to the luff, tears along the leach, tears where a UV cover had been added, holes from sharp hardware, minor delamination, and old botched repairs. Our focus here is not on major seam failures that deserve a trip to the sailmaker or on resurrecting sails that have begun to delaminate and crack from age and are not repairable. The focus is on repairing small holes and even long tears in low stress areas; projects that the savvy sailor with the proper materials and basic skills can easily master.
What We Tested
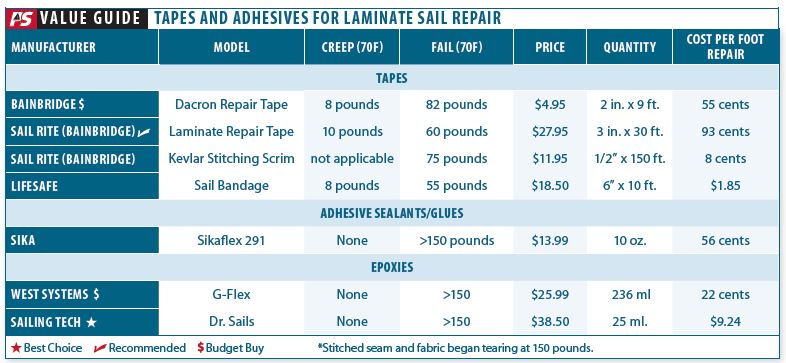
Repairs varied from structural areas that require high-strength adhesive repairs supplemented with webbing and stitching, to tears in low stress areas that the proper tape could address in a permanent way. Sail repair tapes included Carbon Kevlar Repair Tape from Sailrite, Bainbridge Polyester Repair Tape, and Sail Bandage from Lifesafe. Adhesives included Dr. Sails, West Systems G-Flex, and Sika 291.
How We Tested
In the lab, we took samples of each adhesive and tape, applied them to laminate sail cloth, set them up in the same rig we used in PS November 2017, and tested them for shear strength and creep. We also placed test samples on our rooftop exposure rack to see how UV affected them.
For some real world feedback, we took products into the field and tested them on several common faults: luff and leach tears parallel to the fiber orientation, bolt rope tears, and small holes.
Observations
The polyester tape, carbon/Kevlar reinforced tape, and plain film all failed due to adhesive limitations in the same general range; about 55-75 pounds per inch of repair (this is tested with one-side taped-in practice the figure is double because you should tape both sides). They creep with sustained loads around 8-10 pounds/inch, depending on the temperature. Thus, tapes should only be used for non-structural repairs in low stress areas; punctures, luff tears, and tears that run parallel to the warp.
The stress on non-structural repairs, such as tears near the bolt rope or small holes in the body of the sail, is generally lower than the tapes adhesive strength, so tape will work here. However, structural repairs near the leach or foot require matching the original strength. Based on our findings, Dr. Sails and G-Flex are best suited for areas of high load, although other options, combined with reinforcing stitching, might work.
There was a 30 percent difference in strength between seams sewn with Bainbridge Kevlar reinforcing scrim and those sewn without. However, since all the major tears we repaired in the field were the result of seams sewn without reinforcement, we believe the difference becomes even greater over time, as the film flexes repeatedly.
After eight months of rooftop UV exposure-a long time for a laminate sail-the seam mended using G-Flex epoxy showed significant deterioration. Apparently UV penetrates right through the clear Mylar, causing the relatively rapid deterioration of materials that lack UV protection. UV resistance is obviously an important factor when selecting glue or sealant for any type of transparent material. The tape (polyester and Mylar/carbon) and Dr. Sails repairs remained like new.
Sail repair doesn’t stop at the sail itself. If the problem is abrasion or catching on something on the rigging or bowsprit, eliminate the problem. If thats not possible, a sacrificial wear patch can prevent the inevitable tear.
Although laminate cloth is probably the correct repair material for most holes, Sunbrella or polyester sailcloth patches glued on with polyurethane can make good wear covers near the tack. Polyurethane adhesives bond better to the cover and are more flexible, helping to compensate for the variation in elasticity between the Sunbrella and polyester sailcloth. Because polyurethanes are applied more thickly, they are more tolerant of wrinkles and poor clamping. They are also extremely messy to work with-be sure to carefully mask off the material surrounding the repair area.
If you must stitch through laminate, reinforce the area with either polyester repair tape or Bainbridge Kevlar stitching scrim. This will prevent the stitching from creating a tear here fault line.
The Laminate Sail Repair Tape sticks very well to fresh, unwrinkled Mylar, but not so well to polyester or heavily wrinkled, worn Mylar. It often peeled easily unless the edges were secured with a strip of Bainbridge Dacron (polyester) Sail Repair Tape. The bond of the thinner, more flexible Bainbridge tape seems to improve over time, holding the heavier tape in place. Tape works best in areas that don’t flog-jib leaches are a tough application.
Among adhesives, many hold, but there is no comparison in terms of making a fast strong, flexible repair: Dr. Sails is the leader. Polyurethanes and G-flex will work temporarily, but the result is much stiffer and epoxy is vulnerable to UV. Long curing times can make it difficult to create a good bond; clamping with weights (sand bags are best) is required and the sail wont be off the floor for days. Ordinary epoxies, including 5-minute epoxies, are too rigid and will result in a weak repair that will fail if the repair flexes too much. For laminate sails, were sold on Dr. Sails.
Delamination of the film from the fibers is another sign of aging, particularly on older sails and headsails that have flogged. This is a sure sign that the adhesive holding the skins together is no longer working. This type of failure, unfortunately, can’t be repaired, and will often progress into catastrophic delamination. This can happen quickly.
Glued repairs and tapes have nothing sound to adhere to. If the damage is restricted to one panel and the sail is not too old and otherwise sound, a few sail lofts, such as Sail Technologies ( www.sailtechnologies.com ) will remove the old film and apply a new film. This is outside the scope of our investigation.
Although narrower polyester tapes can provide nearly the same strength as the wider laminate repair tapes, the film in laminate sails tends to suffer from fatigue. With new sails, the wider tapes better distribute the load and provide reinforcement that the laboratory pull-test numbers don’t reflect.
Sailrite Laminate Sail Repair Tape
Consisting of a heavy Mylar film with Kevlar and carbon fibers crisscrossing at 90 degrees, this material adheres well to films, so long as it is rubbed down hard in warm conditions. It does not stick so well to polyesters, so sew it down where it overlaps on polyester luff ropes and reinforcements, and cover the ends with Bainbridge Dacron Sail Repair Tape. A layer of tape is required under the stitching, and a Dacron tape strip should be applied over all edges to prevent peeling, especially when repairing older, weathered Mylar. We had some minor problems with peeling after 6-10 months in the field.
Bottom line: Sold in rolls four inches wide and 15 meters wide, Sailrite Laminate Repair Tape is an important addition for every laminate sail repair kit. Recommended.
Bainbridge Dacron Sail Repair Tape
While not quite as low-stretch as the Mylar/carbon tape, repairs often come down to adhesive grip, and the Bainbridge tape is tenacious if rubbed down hard. This is very useful for providing extra peel resistance at the ends of the heavier carbon fiber tape and for preventing tears anywhere stitching is required. It is also available in widths up to 5.7 inches, and sold as High Tack Insignia Cloth.
Bottom line: A roll of this tape is vital to every sail repair kit-laminate or polyester. Budget Buy.
Life Safe Bandage
Although unreinforced, this tape is relatively thick and has a tenacious adhesive. Used in low stress areas, or where the fibers are still good but the film is getting wrinkled and weak, it can add a few years of service.
Bottom line: Recommended for reinforcing tired film.
Cruisers have long been using polyurethane adhesive sealants for sail and canvas repairs, but the mess and time required is even more troublesome when working with laminated sails.
Testers liked this product on polyester sails in Part I. They liked it even more on laminates. The fast cure means you can roll up the sail and put it back in the air a lot sooner. The minimally permeable surface of the laminate means a little glue goes a long way and that it spreads and squeegees evenly. It is more flexible and stronger than other epoxy products. The motionless mixer and the tandem dispensing syringe made application neat, and can be especially helpful for repairs at sea, when cups, stir sticks and clean-up supplies are limited.
The syringe helps distribute the glue evenly, saving time at later stages in the job. A 10 ml syringe is good for about 100 square inches if you spread it well. However, it cures very quickly, so we recommend repairing no more than 50 square inches and using overlapping patches as needed (or use two workers).
Bottom Line: This is our Best Choice in laminate sail repair adhesives and belongs in every laminate sail repair kit.
West Systems G-Flex
Although much less flexible than Dr. Sails, G-Flex flexes just enough to remain strong and is compatible with working sails. However, spinnakers are out of the question. It is more widely available and less expensive, but the overnight cure time is a nuisance and clamping is a challenge. It is also vulnerable to UV damage, although this takes about 3-6 months of sun exposure to become apparent.
Bottom Line: Wed use it if Dr. Sails was not available, and the result would last at least 60 days. Budget Buy.
Sika 291 Polyurethane
Though not generally recommended for laminate sails, Sika 291 matched performance criteria of the more specialized products. It has good adhesion, good durability, good flexibility, and its cheap. The down sides are the mess, the long cure time (generally several days), and limited UV resistance. Still, we like it for gluing on Sunbrella wear patches, which helps protect other repair from UV damage.
Bottom line: Recommended for wear patches only.
Conclusions
Fixing laminate sails doesn’t have to be any more difficult than fixing polyester sails, and thats a good thing, since they seem to need minor fixes more often. Ignore them and a major failure looms.
Testers were impressed with the Sail Rite Laminate Sail Repair Tape combined with Bainbridge Dacron Sail Repair tape, for repairs in low-stress areas. So long as you have extra patch material on board, you can fix most tears using Dr. Sails. As for the luff tape and battens- a needle and palm is still the answer.
The luff is a relatively low-stress area, polyester sails rarely tear here. The cause in a laminate sail is the lack of fibers oriented at 90 degrees to the mast, compounded by a row of stitches holding the luff tape, creating a natural tear line.
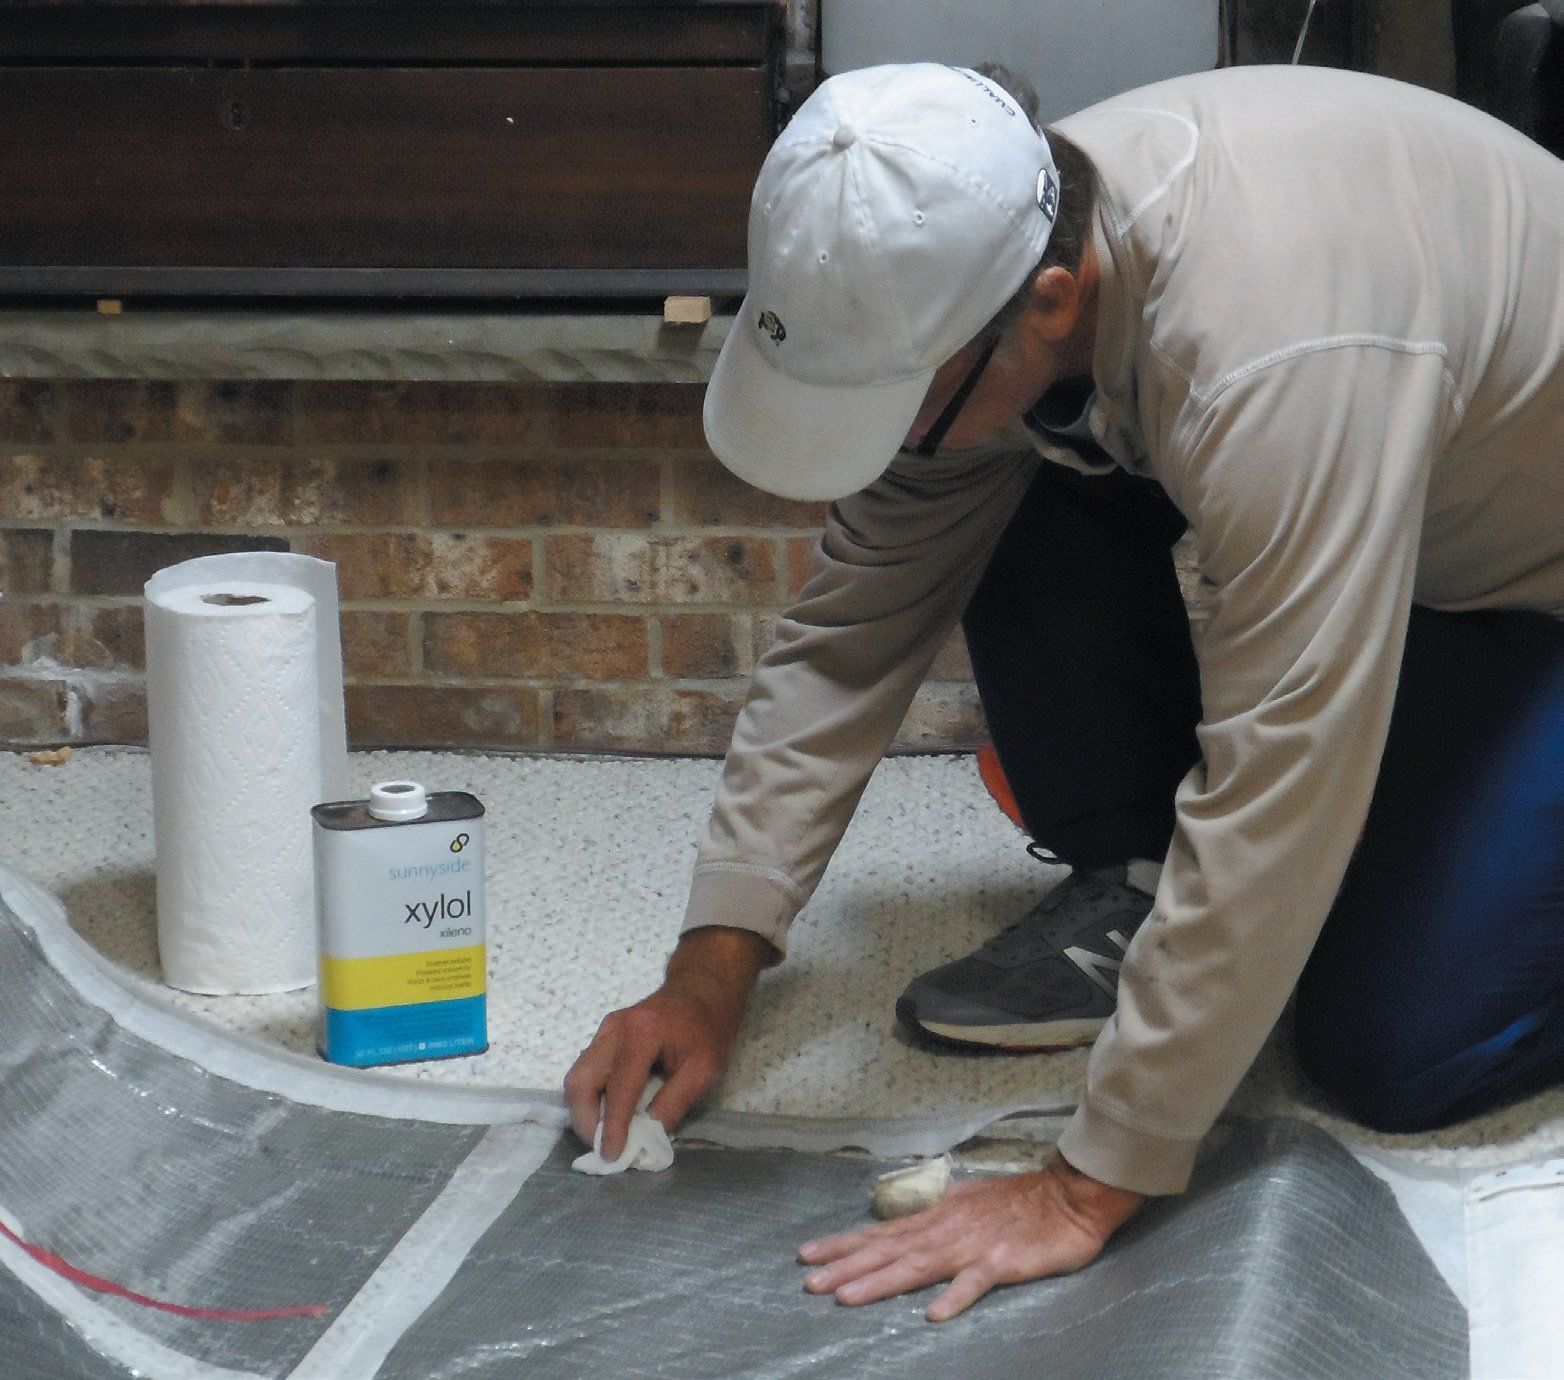
Because it is a low-stress area, the repair of even a long tear can be made with tape, but a few precautions are required: Wipe the area down several times with xylene. Most sailors use a dry film lubricant on the bolt rope or slugs, and this will prevent the tape from sticking.
- Align the edges using masking tape on the reverse side. Observe that the luff tape and sailcloth may have slightly different length, so this may require some careful work.
- Use a wide mylar tape, reinforced tape with fibers running in all directions. But keep your traditional sail repair tools handy; you’ll need them.
- Apply the repair tape above 70F. Rub down hard. Round the corners to prevent snags and hard spots. Stay ¼-inch away from the bolt rope to avoid hoisting problems. Run the tape 6 inches past the tear.
- Because the tape will not stick well to a Sailcote-soaked luff tape, a row of stitches is required. Apply a layer of polyester repair tape or insert a stitching scrim to prevent tearing along the stitch line.
- Reinforce all edges against peeling with a layer of polyester tape and rub down hard with a seam rubber (shown here). Repeat on the other side. Repeat on the other side (remove the masking tape).
Finally, to complete the repair you need to stitch along the center of the luff tape and rub down hard again. If the ambient temperature is below 70F, consider using a 90-120 F iron at the very lowest setting (keep it moving) to help activate the adhesive.
- The Cruising Sailor’s Sail Repair Toolkit
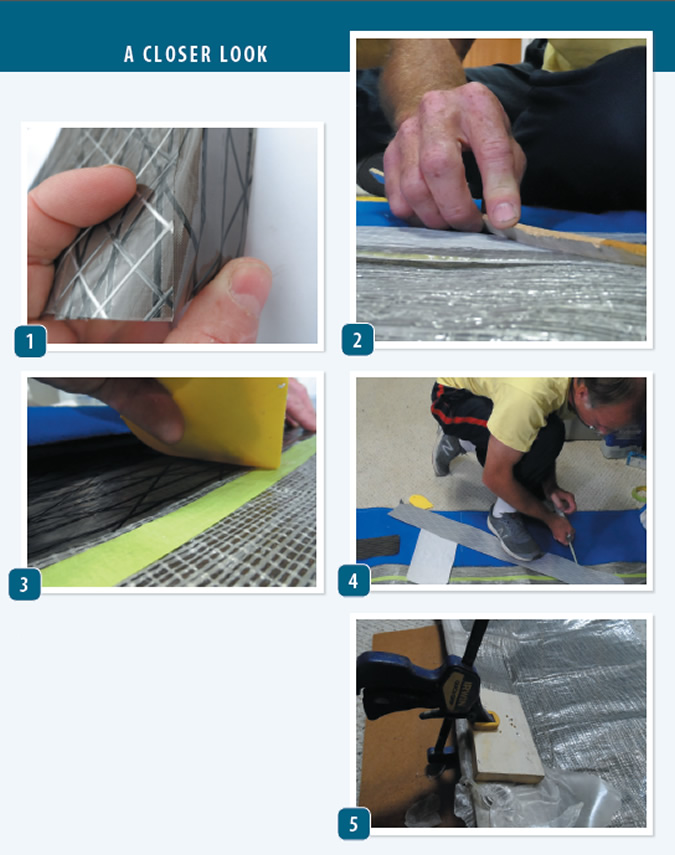
The best materials and adhesives will be of little use if you don’t take care during the repair process and carry out the required prep work. This true for older, dirty sails, as well as for newer sails with coatings that might prevent adhesion. Ideally, the repair should be made indoors on a flat surface at room temperature. We made the longest lasting repairs using both adhesives and tapes. We like tape for simple fixes in low stress areas, and adhesives when high loads and flogging demands something more resilient and durable.
- Even after six months in the field, the Sailrite carbon-Kevlar tape remains well adhered and will not peel.
- Testers used a stick to evenly apply an thin layer of Dr. Sails epoxy adhesive.
- Use a spreader to work the adhesive toward the edges of the repair area and remove air bubbles to ensure a good bond. Masking keeps it neat.
- The firm and steady pressure required to dispense Dr. Sails can be fatiguing, but the result is even distribution and lasting repairs.
- A board was clamped over waxed paper over night to ensure a tight bond and proper shape in this bolt-rope repair (G-Flex epoxy).
- West System
RELATED ARTICLES MORE FROM AUTHOR
This was a great article! We just discovered a rip along our dacron genoa along a newly installed sacrificial uv cover.
You helped me think about what products might better apply to my repair needs. Thanks!
Glad we could help Matt. Just be aware of our caveat that some sailmakers are none to happy to re-repair sections of a sail that has polyurethane adhesive sealant on it because it can gum up the machine. Here is a related step-by-step video from the late Patrick Childress. If you find it useful, I’m sure Rebecca would appreciate a tip in the tip jar. https://www.youtube.com/watch?v=ge3FcEiYl4w
Also John Neal of Mahina Expeditions wrote about this for us as well. https://www.practical-sailor.com/sails-rigging-deckgear/simple-sail-repair
LEAVE A REPLY Cancel reply
Log in to leave a comment
Latest Videos

Cabo Rico 34 Boat Review

Super Shallow Draft Sailboat: The Leeboard Sharpie

Hans Christian 41T – Boat Review

Seven dead after superyacht sinks off Sicily. Was the crew at...
Latest sailboat review.

- Privacy Policy
- Do Not Sell My Personal Information
- Online Account Activation
- Privacy Manager
| |
|
COMMENTS
Knowing how to repair your ropes can save you money and keep your boat in top shape. Boat ropes can suffer wear and tear over time. Learning basic rope repair techniques can extend the life of your ropes and save you from unnecessary replacements. Common repairs include splicing, whipping, and patching frayed sections. Conclusion
Even after a very careful repair job, you can still see the slightly off-color nature of this repair to a helm station. If you don't get a perfect match, don't be too hard on yourself. Courtesy Lenny Rudow. Gelcoat paste will do the trick, and you can use a regular putty knife to create a smooth surface that fills all the gaps.
utility & industrial commercial marine yacht & mega-yacht military & govermentRopes and Lines for Yachts & More - All Your Cordage Needs Rope Inc (aka Rope Works) has the buying power and expertise of a national distributor, Skip to content. 888-596-7673 +1 954-525-6575.
However, the problem can also manifest as a result of upgrading to Dyneema lines - the lack of stretch increases peak loads on the halyard. The solution is to splice an additional length of outer cover tube over the rope, extending for a couple of feet each side of the clutch. This adds extra diameter that gives more material for the clutch ...
Custom Splicing Order. At R&W Rope we have over 10 full-time splicing professionals that are fully trained to meet all manufacturer specific splicing requirements. We are able to splice all constructions of rope as well as wire, rope-to-chain and wire to rope. Whether you need a new anchor rode, main halyard, mooring pendant or simple dock line ...
The clutch is rated to handle 8- to 14-millimeter line, but we did note that slippage increased with smaller diameter rope. The V-cam system applied a rock-solid grip to half-inch double braid with a polyester cover. The Silver series lever made it easy to release the clutch, even with 1,000 pounds of tension.
With synthetic rope such as nylon, the easiest way to repair fraying is to melt the ends with a lighter. Natural rope, such as cotton, can be repaired by sealing the ends in waterproof glue. ... The most common marine rope material is nylon, which is synthetic plastic. Some less premium types of nylon cord are also the easiest to fray, as are ...
The instructions in YACHT 9/2018 - available in the DK shop - cover everything from emergency repairs with special adhesive tape to a quick splice at sea and professional halyard repairs. Or you can download the instructions directly via the link below.
England and Wales company registration number 2008885. Rope may heat-sealed, but it pays to reinforce this. Follow our how-to guide to fixing frayed mooring lines.
Speak with a specialist to learn how you can grow with Birdeye. We are reachable at [email protected]. Read 46 customer reviews of Elite Marine Specialists, one of the best Boat Repair businesses at 101 16th Ave S #9, Ste 9, Saint Petersburg, FL 33701 United States. Find reviews, ratings, directions, business hours, and book appointments online.
Soaking for an hour in weak acid cleaners (typically based on phosphoric acid, oxalic acid, citric acid, or acetic acid) such as Lime-Away or Shower Power can weaken the rope by as much as 50 percent without any worthwhile cleaning benefits. Avoid all acid cleaners, including vinegar, and diluted acids.
Finally got around to replacing the rope clutches. I decided to bite the bullet and replace both, since Defender had them on sale for a mere $225 each. It turned out to be much simpler than expected. I had an impact driver ready but the machine screws came out without issues using a regular screwdriver.
Even if there's no outward evidence of chafe or other damage, these should be replaced. The cover of a rope is often polyester, especially in cruising applications. However, this is frequently blended with aramids on high-specification racing yachts for heat protection. Cordura is used in covers on low-stretch halyards to provide a rougher ...
Hey guys! In this video we show you how we fix a frayed rope. It's a simple inexpensive fix that lasted us over a year of hard use the last time we did it.En...
Both Rope Proof and Granger's 2-N-1 provided eight months of solid protection through winter spring and summer. Based on our experience, Rope Proof should give multi-season protection, while Granger's will likely protect for only one season. Not only was ice kept at bay. Squeaking on the drum was reduced, and lines tended to slip off the ...
Marine Lines and Ropes at Fisheries Supply. Marine lines and ropes are essential for anchoring, sailing, towing, and docking your boat. At Fisheries Supply, we carry premier brands, offering a comprehensive selection of top-grade marine ropes. Whether for recreational or professional use, our products cater to all boating needs, ensuring both ...
Simple cleats. For lightly loaded control lines (up to 150kg) used without winches, it's possible to use clam cleats, jam cleats or cam cleats if they are up to the job. As the loads increase, and unless you have a winch for each line, you'll need a rope clutch or jammer ahead of the winch to hold the load of one line while. you winch in ...
We recommend adding the boat's length to its beam and then doubling the sum to ensure you order enough rubrail to complete the job. Taco Marine is a popular OEM supplier of rubrails for many boat manufacturers and offers an extensive line of replacement rubrails and inserts in kit form. Here are the basic steps in the replacement of an insert ...
Diagnostics and Repairs On-Site. When you suspect you have a problem with your boat or trailer, you can call our team. Marine Essentials. Pontchartrain Yacht Works also offers retail items for sale, such as rigging, plumbing and decking hardware, maintenance and cleaning items, boat repair materials, electrical parts, line, rope, and more!
Our representatives can guide you in selecting the appropriate size and length for your boat dock lines and mooring ropes. As a general rule: Diameter: 3/8" for boats up to 25 feet, 1/2" for 25-35 feet, 5/8" for 35-45 feet, and 3/4" for larger vessels. Length: Transient dock lines should be about the length of your boat, while permanent mooring ...
Polyester has long been the workhorse sail fabric; durable, easy to sew and handle, and relatively stretch resistant. It is also relatively easier to repair (see Sail Repair Tapes vs. Glues, PS November 2017). Racers needed something that was lighter and held an aerodynamic shape better, and so laminate sails were born, using Mylar films and non-stretch fibers such as carbon and Kevlar.
St. Petersburg Yacht Sales and Service 727-823-2555. St. Petersburg Yacht Sales and Service has been serving customers since 1964 and is located in downtown St. Petersburg. We are close by the St. Petersburg Municipal Marina where we have some of our many brokerage boats on display.
Check out the rest of the site for photos and past work. Progressive Marine Service, Inc. 1351 Bay St. S.E. St. Petersburg, FL 33701. Office: (727) 822-2886. FAX: (727) 822-1759. If you have Outlook, click this link to email: [email protected]. Or to use a contact form click below: